
- Michał Rasztabiga
- Read in 5 min.
Table of Contents
Currently, software systems are working with large and still growing amounts of data. End users create, update, delete, and read this data multiple times through handy graphical user interfaces.
Often, these data must be stored in an organized way so that future access to it is quick and reliable. And achieving this can be challenging. Choosing the persistent storage type for our data usually depends on many factors. We have to consider the nature of the data or business requirements regarding performance and availability. Moreover, different storage types might be used in the same system serving different purposes.
I bet that almost every software developer has already encountered (or will encounter soon) the concept of indexing. In this article I will describe how to index and filter large amounts of data in a performant way using Apache Solr search engine connected to and controlled from .NET WEB API.
Indexing and its purpose
The indexing term applies to many data-related technologies. In classic relational database systems, developers implement this using B-trees, while in the Apache Solr search engine, they use an inverted index concept.
Regardless of technical implementation, at the end – it is all about performance and user experience during data retrieval.
When to consider indexing with Apache Solr?
It’s always good to consider Apache Solr if we deal with large text datasets. Especially if we want to search them with complex filters. Solr efficiently indexes and queries high volumes of data. It will work great for scenarios when input data sources for indexes are complex SQL queries that require multiple joins between tables.
Solr cannot be considered as a real full-featured database solution. Therefore it has some limitations. Its primary goal is to work on raw, well prepared text data to enable full-text searching. Avoid using this technology as a main storage solution, as it is not designed to describe relationships between data.
Consider Apache Solr a great extension that can coexist with other data sources (like relational databases). It can provide text searching features and performance that normally would be difficult to achieve with just primary storage like relational databases.
Apache Solr under the bonnet
Apache Solr is a great tool, but it owes its efficiency to another Apache product – Lucene search engine, which Solr uses internally. There is a significant difference between these two products.
Lucene is a high-performance, full-featured text search engine library written in Java (with later ports in .NET). It offers advanced indexing and searching capabilities but no user interface. Developers often use Lucene when building applications that need core search functionality and the ability to manage search configuration details.
On the other hand, Apache Solr is a search platform built on top of Lucene. It provides features like REST APIs for managing indexes, distributed searching, caching, replication, a web-based user interface and many more.
The key to efficiency is previously mentioned inverted index which is a core data structure that allows full-text searching.
An index contains segments (each one is an inverted index) stored as files on the disk. The basic unit of indexing is a document. A document is a collection of fields where each field contains a portion of data.
When we load document data into an index the first thing that happens is the process of tokenization and analysis. During this operation, text from each field of document is divided into smaller parts – tokens (words). Lucene can apply additional filters on tokens by converting them to lowercase, removing stop words or stemming before storing.
Apache Solr in practice – integration with .NET Web API
At this point let’s try to setup a .NET Web API that connects to the Solr instance, feeds the index with vehicles related data and exposes the endpoint to the query index with ability to apply some text filters to our queries. We will create all components on a local machine with the help of Docker containers.
Our application will use the SQL Server database as primary storage, where vehicle data is already present and will be indexed later.
Creating a Solr instance
First, we need an Apache Solr instance. The easiest way to create one is to spin up a new docker container instance with it. It can be done using following commands:
docker pull solr:latest

docker run -p 8983:8983 -t solr
After Apache Solr is successfully created, we can reach its dashboard by accessing http://localhost:8983/solr.
From this page we can manage our cores (indexes), add schemas defining fields and their types for our indexes, monitor the state of index and do much more administrative work.
Creating Apache Solr core
For creating a new core (a brand new index in Apache Solr) we will use a CLI command executed directly from the container shell by running the following commands:
docker exec -it <name_of_the_solr_container>

solr create -c extreme_core
Use the first command to access the container’s shell (you can also access it through Docker Desktop if using Windows). The second one uses the Solr command to create a default empty index with an „extreme-core” name.
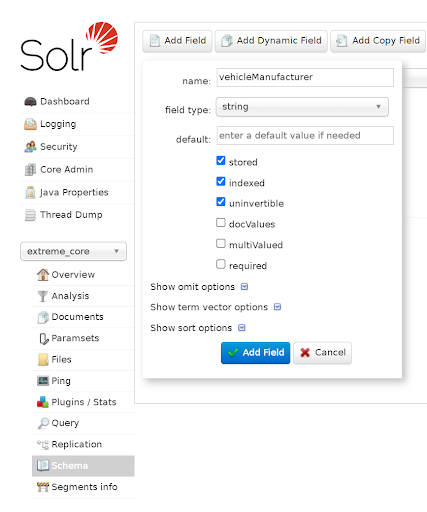
Creating a Apache Solr schema
Previously created core can store index data but it needs a schema file which defines all fields that our index will contain along with their data types. This time let’s use the Apache Solr dashboard to prepare a schema file. Fields that our application will be working with are :
- vehicleManufacturer,
- vehicleModel,
- engineName,
- engineDescription,
- engineDisplacement
All of the above holds string-type data, and we need to define each as schema file members.
The illustration below shows the Solr dashboard page with selected
„extreme core” for which a new schema field is being defined.
We need to repeat the field creation process for all index field.
After setting up core and schema, our Apache Solr instance is ready to operate.
Setting up .NET application
Next step will be to create a .NET Web API. We will use a simple application to query our two separate data sources: the SQL Server database and the previously created Apache Solr index.
To connect to a relational database we will use EF Core ORM with LinqKit. While for interactions with Apache Solr instance – dedicated .NET library: SolrNet.Core.
Therefore, we need to install nuget dependencies listed below:
- LinqKit
- Microsoft.EntityFrameworkCore.SqlServer
- SolrNet.Microsoft.DependencyInjection (contains SolrNet.Core along with extension methods used for services registration)
We have prepared vehicle data in advance, totaling approximately 200,000 records stored in a database table.
At this point I will skip the process of relational data provider setup. As it is not the main subject of this article, I will jump straight to the code level index interactions.
Registering core components
To make our application capable of working with an index we need to register some internal and own services during startup as following:
public static IServiceCollection AddIndexDemoModule(

this IServiceCollection services,

IConfiguration configuration)

{

   services.AddSolrNet("http://localhost:8983/solr/extreme_core");

   services.AddScoped<ISolrCoreAdmin, SolrCoreAdmin>();

   services.AddScoped<ISolrStatusResponseParser,SolrStatusResponseParser>();

   services.AddScoped<IVehicleDataSolrRepository,VehicleDataSolrRepository>();

   services.AddDbContext<VehiclesDbContext>();

   services.RegisterMappers()

       .AddBus(configuration)

       .AddMediatR();

    return services;

}
The .AddSolrNet method establishes connection with index by name pointing to the Apache Solr instance address. ISolrCoreAdmin and ISolrStatusResponseParser services are used to enable Solr core management.
The last component – IVehicleDataSolrRepository is not an internal Solr class but a custom wrapper service that allows actual data querying.
Creating data structure
We also need a class to represent the indexed document instance which looks like below:
public class VehicleData

{

    [SolrUniqueKey("identifier")]

    public int Id { get; set; }

    [SolrField("vehicleManufacturer")]

    public string VehicleManufacturer { get; set; };

    [SolrField("vehicleModel")]

    public string VehicleModel { get; set; };

    [SolrField("engineName")]

    public string EngineName { get; set; };

    [SolrField("engineDescription")]

    public string EngineDescription { get; set; };

    [SolrField("engineDisplacement")]

    public decimal EngineDisplacement { get; set; }

}
Apart from actual text data, Solr needs a unique identifier field for each document. We decorate all fields defined in the above class with appropriate attributes that map their names to those present in the index.
Implementing Apache Solr querying service layer
From VehicleDataSolrRepository service level we can access the ISolrOperations<VehicleData> interface through dependency injection.
This interface serves as a single entry point for all VehicleData type-related operations that we can perform on an index (CRUD operations).
Take a look at the code snippet below, which presents a whole method used for querying an index with pagination and some full-text filtering applied.
public async Task<(IEnumerable<VehicleData>, long)> Search(

SearchTerm[] searchTerms,

int page,

int rows)

{

    SolrQueryResults<VehicleData> countResult;

    if (searchTerms.Length == 0)

    {

        countResult = await _solrOperations.QueryAsync(SolrQuery.All,

  new QueryOptions

        {

            Rows = 0

        });

        return ([.. _solrOperations.Query(SolrQuery.All,

            new QueryOptions {

                Rows = rows,

                StartOrCursor = new Start(page * rows),

                OrderBy = [new SortOrder("identifier")]

            })], countResult.NumFound);

    }

    var queryParts = new List<SolrQuery>();

    foreach (var term in searchTerms)

    {

        var termValue = term.Value;

        if (searchTerms.Count() == 1)

        {

            termValue = $"\"{term.Value}\"";

        }

        else

        {

            termValue = $"*{term.Value}*";

        }

        queryParts.Add(new SolrQuery($"vehicleManufacturer:{termValue}"));

        queryParts.Add(new SolrQuery($"vehicleModel:{termValue}"));

        queryParts.Add(new SolrQuery($"engineName:{termValue}"));

        queryParts.Add(new SolrQuery($"engineDescription:{termValue}"));

    }

    var combinedQuery = new SolrMultipleCriteriaQuery(queryParts, SolrMultipleCriteriaQuery.Operator.OR);

    countResult = await _solrOperations.QueryAsync(combinedQuery,

new QueryOptions

     {

        Rows = 0,

     });

    var response = await _solrOperations.QueryAsync(combinedQuery,

new QueryOptions

     {

        Rows = rows,

        StartOrCursor = new Start(page * rows),

        OrderBy = [new SortOrder("identifier", Order.ASC)],

     });

    response.OrderBy(x => x.Id);

    if (response != null)

    {

        return ([.. response], countResult.NumFound);

    }

    return ([], 0);

}
For the purpose of this demo, the index was previously fed with test data coming from SQL Server relational database using following code:
public async Task<Unit> Handle(

SeedIndexedVehiclesCommand request, CancellationToken cancellationToken)

{

    var dbData = await _mediator.Send(new GetVehiclesRelationalDataQuery(

new GetVehiclesRelationalDataRequest

      {

        Page = 0,

        PageSize = 10_000_000,

        SearchTerms = []

      }), cancellationToken);

    await _vehicleDataSolrRepository.AddRange(dbData.VehiclesData);

    return await Unit.Task;

}
Finally, we can now expose a standard POST endpoint to be able to query our Solr indexed data using filters through HTTP requests.
Indexed data fetch vs. standard DB fetch using EF Core
I’ve mentioned that our application has connection to both relational data providers and our Apache Solr index. In fact it is on purpose, because thanks to this we can expose two different endpoints for data fetching from both providers and observe how they behave under high stress.
It’s worth mentioning that for this competition I enabled the full-text search option in SQL Server and created some indexes on tables.
Below you can find the code snippet of the method used to fetch data using our relational provider:
public Task<GetVehiclesRelationalDataResponse> Handle(

    GetVehiclesRelationalDataQuery request,

    CancellationToken cancellationToken)

{

    var predicate = PredicateBuilder.New<Domain.VehicleEngine>();

    if (request.Payload.SearchTerms.Length == 0)

    {

        predicate = predicate.Or(x => true);

    }

    foreach (var searchTerm in request.Payload.SearchTerms)

    {

        if (request.Payload.SearchTerms.Count() == 1)

        {

            searchTerm.Value = $"\"{searchTerm.Value}\"";

        }

        else

        {

            searchTerm.Value = $"\"*{searchTerm.Value}*\"";

        }

        predicate = predicate.Or(p => EF.Functions.Contains(

p.Engine.Name, searchTerm.Value));

        predicate = predicate.Or(p =EF.Functions.Contains(

p.Engine.Description, searchTerm.Value));

        predicate = predicate.Or(p => EF.Functions.Contains(

p.Vehicle.Manufacturer,searchTerm.Value));

        predicate = predicate.Or(p => EF.Functions.Contains(

p.Vehicle.Model, searchTerm.Value));

    }

    var vehiclesData = _vehiclesDbContext

        .VehicleEngines

        .Include(x => x.Vehicle)

        .Include(x => x.Engine)

        .AsExpandable()

        .AsNoTracking()

        .Where(predicate);

    var count = vehiclesData.Count();

    var vehiclesDataPaginated = vehiclesData

         .Skip(request.Payload.Page * request.Payload.PageSize)

         .Take(request.Payload.PageSize)

         .Select(x => new VehicleData

         {

             Id = x.Id,

             EngineName = x.Engine.Name,

             EngineDescription = x.Engine.Description,

             EngineDisplacement = x.Engine.Displacement,

             VehicleManufacturer = x.Vehicle.Manufacturer,

             VehicleModel = x.Vehicle.Model

         })

         .OrderBy(x => x.Id)

         .ToArray();

    return Task.FromResult(new GetVehiclesRelationalDataResponse

    {

        VehiclesData = vehiclesDataPaginated,

        TotalRowCount = count

    });

}
Data visualization, response times
With two endpoints exposed from our API: one for direct SQL Server and one for Solr index querying, we can visualize our data from using some kind of client. In my case it is a React application.
Below you can see a simple listing with some text filtering options available.
It is possible to change the data source from index to relational provider as well as text matching behaviour from „any” to „exact”. „Any” means – try to match any word from the whole sentence in any column. „Exact” – try to match the whole filter sentence in any column.

Observing response times for requests made to both relational and index endpoints with the same filter term applied indicated that index querying is several times faster than database querying. For small sample average response times were: ~60 [ms] for db query and ~10 [ms] for index query.
Performance tests under higher load using K6, InfluxDb and Grafana
Comparisons made using the React client applications are promising but the real world is much more complicated. There are multiple users accessing applications simultaneously which can also affect the performance of queries. We can also replicate the application itself to better handle network traffic.
To simulate such situation we can use a technology stack of:
- K6 – for performing load tests,
- InfluxDb – for storing tests results,
- Grafana – for near real time visualization of test results stored in InfluxDb
We can run the entire above stack in the form of Docker containers, i.e., using Docker Compose (make sure to set up a network between containers so that they can access each other).
With Grafana connected to InfluxDb we can visualize two K6 tests run – one for relational db query and one for indexed data query. K6 uses .js files to describe test scenarios. Therefore, we can prepare two files describing our intention of endpoint testing (contents shown below).
Relational data endpoint test scenario:
import http from 'k6/http';

import { sleep } from 'k6';

export const options = {

  vus: 50,

  duration: '300s',

};

export default function() {

    const data = {

        "searchTerms": [{

            "value": "Turbocharged Direct Injection diesel engine by

Volkswagen"

        }],

        "page": 1,

        "pageSize": 100

    };

    const params = {

        "headers": {

            'Content-Type': 'application/json'

        }

    };

    http.post('https://localhost:7034/relational-data/vehicles-data-relational', JSON.stringify(data), params);

    sleep(1);

}
Index data endpoint test scenario:
import http from 'k6/http';

import {sleep} from 'k6';

export const options = {

    vus: 50,

    duration: '300s',

};

export default function() {

    const data = {

        "searchTerms": [{

            "value": "Turbocharged Direct Injection diesel engine by Volkswagen"

        }],

        "page": 1,

        "pageSize": 100

    };

    const params = {

        "headers": {

            'Content-Type': 'application/json'

        }

    };

    http.request('POST', 'https://localhost:7034/index-data/vehicles-data-index', JSON.stringify(data), params);

    sleep(1);

}
Important – for both test scenarios, we assume the same search term in exact match mode, set the test duration to 300 [s] (5 minutes), and have 50 VUs (virtual users) perform requests simultaneously.
After we prepare the test scenarios, we run them with K6 using the following command:
k6 run <name_of_scenario_script>.js --out influxdb=http://localhost:8086
Note that we specify the –out argument to point to the influxdb location where we send the test results. Finally, after we finish the test’s execution, we can view the results in the Grafana dashboard.
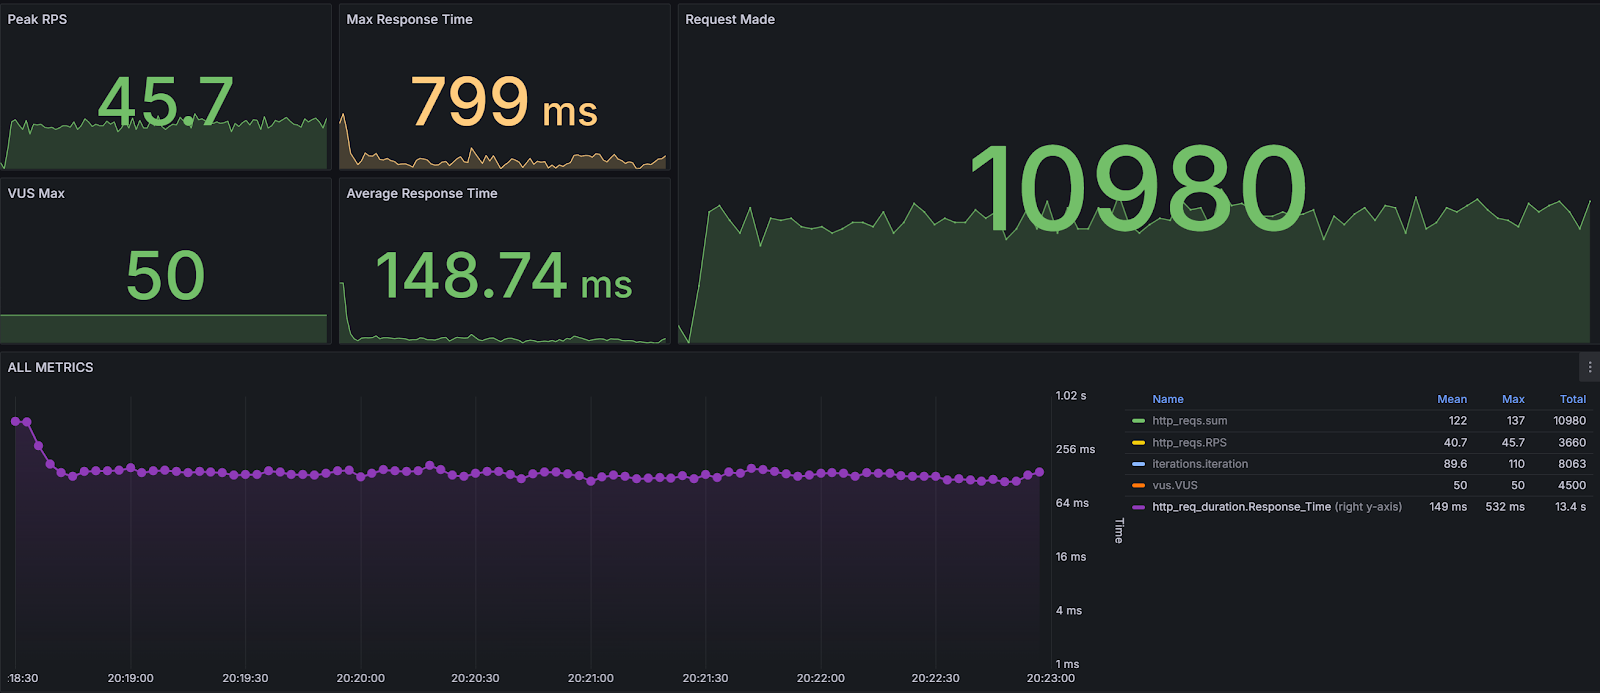
Performance tests results of relational data endpoint:
Performance tests results of index data endpoint:
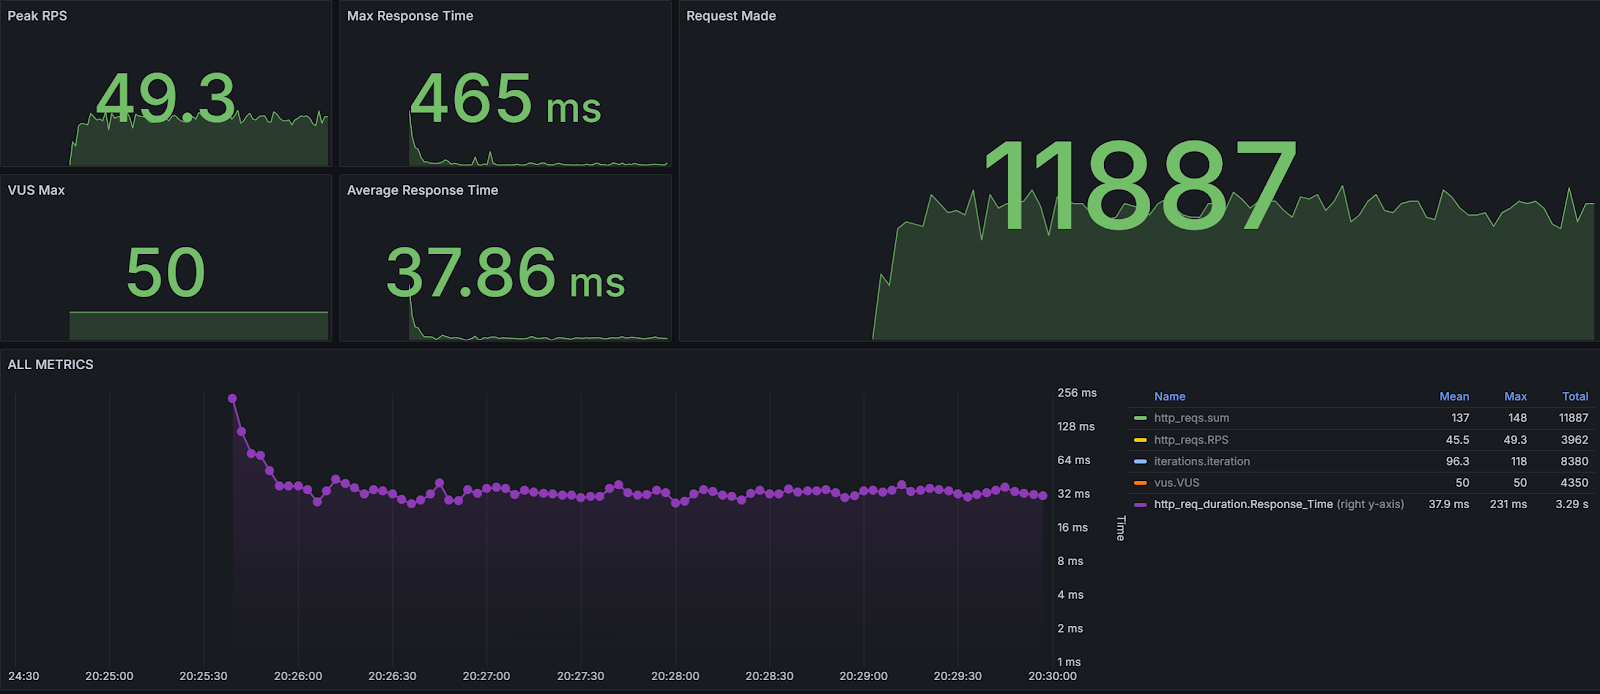
Charts above are part of the official dashboards of K6 for Grafana.
We can see some interesting metrics here like total number of requests made or max and average response times.
As you can see, the average response time for an Apache Solr endpoint query is about ~4 times faster than the same type of query sent to an endpoint that uses SQL Server as a data provider.
Furthermore, we can also observe that 95% of requests sent to Apache Solr endpoints finish under 53.4 [ms] while for relational providers it is 232 [ms].
Summarize
Apache Solr can be a powerful tool if we want to achieve great performance of search-based functionalities in our applications. It provides near-real time indexing, faceted filtering, data analytics or geospatial queries.
It’s scalable and highly available thanks to the use of its distributed architecture and sharding. Working with index from the programmer perspective is as simple as using any relational data provider.
It’s clear that this article describes just the basic configuration of both data retrieval methods using Solr and SQL Server. Further optimizations of presented solutions are, of course, possible. However, it’s worth noting that spinning up a new container with Apache Solr is relatively simple and not a time-consuming task while functionalities and performance gains can be impressive.
Interested to using Java for you business?
Check out our services and migrate with us to the next level