- Kacper Stefanowicz
- Read in 8 min.
This article presents the second part of an example of creating the infrastructure needed to deploy a simple Spring Boot application with a connection to the Cloud SQL database. You can read the first part here: Terraform: part 1.
If we are using Intellij IDE it is worth installing plugin HashiCorp Terraform / HCL language support.
In this example we will create an environment which we will need to deploy a simple app Spring Boot + PostgreSQL in Google Kubernetes Engine. I prepared repository in GitHub where you can find two branches. Only-app is a branch where only the Spring Boot is located and this is the branch in which you should work doing the actions listed below. Terraform-with-app branch contains the end result of described steps.
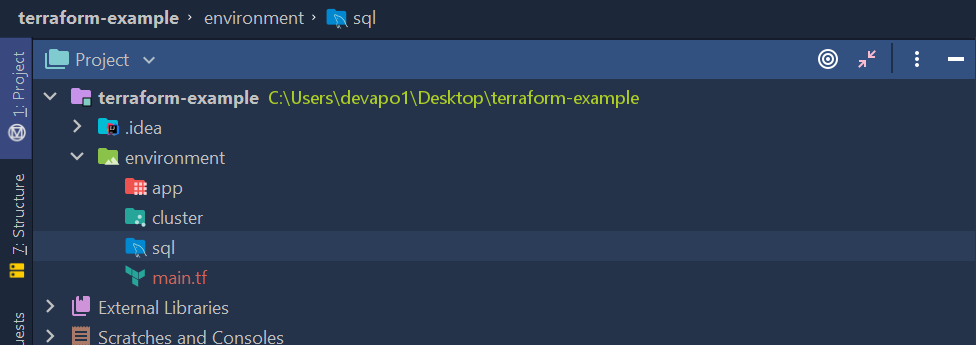
The creation of environment can be divided into 4 modules.
- The main module that is used to perform all the commands
- The ”cluster” module that will contain all the resources needed to make a cluster
- The ”sql” module that will contain all the resources needed to make PostgreSQL base instance
- The ”app” module that will contain all the resources needed to run the app correctly, like service, ingress, security, configMap
We have to create adequate folders and main.tf file which will contain all the necessary providers and modules.

State of infrastructure
Before making the resources, we have to declare that the state of our infrastructure will be stored in a remote server, in this case in the bucket of Google Cloud Storage. The bucket is already made and now backend.tf file has to be created. It will tell the terraform that we want to use GCS backend.
terraform {
  backend "gcs" {
    bucket = "tfstate-kacper"
  }
}
Google provider
To make Google Cloud Engine resources we need an appropriate provider.
provider "google" {
  version = "3.36.0"
  region = var.region
  project = var.project_id
  credentials = file(var.credentials)
}- version → version of provider
- region → region where the project is located. If we don’t know it, we can check it via
gcloud config list compute/region
- project → name of the project, that we made as part of manual steps
- credentials → credentials file path where the previously generated private key to our account is located
As it can be seen some values are downloaded by var.NAZWA_ZMIENNEJ. To do this the variables that will be executed by commands plan, apply, destroy, have to be declared. We have to create new variables.tf file in the environment folder, which will contain declaration of variables.
variable "project_id" {
  type = string
}

variable "region" {
  type = string
}

variable "credentials" {
  type = string
}
Cluster module
We start creating resources from Kubernetes cluster. We don’t needed Kubernetes provider to do this, as Google provider has those resources. In the app folder we create main.tf file which will contain all the resources.
 name = var.name
  location = var.location
  remove_default_node_pool = true
  initial_node_count = 1
}

resource "google_container_node_pool" "node-pool" {
  name = "default-node-pool"
  location = var.location
  cluster = google_container_cluster.cluster.name
  node_count = 1

  node_config {
    preemptible = true
    machine_type = "e2-medium"
    oauth_scopes = [
      "https://www.googleapis.com/auth/devstorage.read_only",
      "https://www.googleapis.com/auth/logging.write",
      "https://www.googleapis.com/auth/monitoring",
    ]
    metadata = {
      disable-legacy-endpoints = "true"
    }
  }
}
This is a cluster configuration which is recommended by the documentation. Here we also create variables.tf file where we create name and location variables.
variable "name" {
  type = string
  description = "The name of the cluster"
}

variable "location" {
  type = string
  description = "Region or zone of our cluster.
                It should be the same region where our project is located"
}
After creating the new module it has to be declared in our main environment file/main.f.
provider "google" {
  version = "3.36.0"
  region = var.region
  project = var.project_id
  credentials = file(var.credentials)
}

module "cluster" {
  source = "./cluster" //path to the folder where the module files are located
  name = "terraform-cluster" // variable "name" declared by us in the "cluster" module
  location = var.region // variable "location" declared by us in the module "cluster"
}
First test
Let’s check if the code is good and the cluster will be made. In order to do this first we have initialize terraform configuration files. In environment folder we enter
terraform init -backend-config="credentials=CREDENTIALS_FILE_PATH”
As we can see, a .terraform folder was created, which contains terraform configuration files

The next step is to make the execution plan. We enter
terraform plan
As we declared variables, but we didn’t give values, terraform asks to provide it with values of the variables. After entering you can see, that in our execution plan there are two resources to add

The last step is to introduce our changes by entering
terraform apply
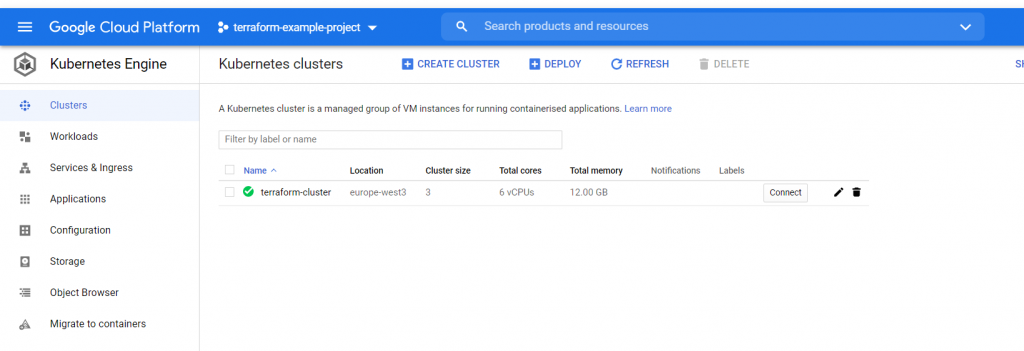
After some time it should be visible in the console

To make sure we can enter the Google Cloud console

SQL Module
Another resource that we’re going to create is PostgreSQL instance. In environment/sql folder we create files named main.tf, variables.tf. The files consist of base instance as well as the user, which we create in order to log in to our instance via the application
main.tf
resource "google_sql_database_instance" "instance" {
  name = var.name
  database_version = var.database_version
  region = var.region

  settings {
    tier = "db-g1-small"
    ip_configuration {
      ipv4_enabled = true
    }
  }
}

resource "google_sql_user" "users" {
  name     = "postgres"
  instance = google_sql_database_instance.instance.name
  password = "postgres"
  depends_on = [google_sql_database_instance.instance]
}
variables.tf
variable "name" {
  type = string
  description = "Instance name"
}

variable "database_version" {
  type = string
  description = "Database version -> MYSQL_5_6, POSTGRES_12, SQLSERVER_2017_STANDARD..."
}

variable "region" {
  type = string
  description = "The region where we want to create the database instances, it should be the project region"
}
Our module should be declared in the main module environment/main.tf
provider "google" {
  version = "3.36.0"
  project = var.project_id
  region = var.region
  credentials = file(var.credentials)
}

module "cluster" {
  source = "./cluster" //path to the folder where the module files are located
  name = "terraform-cluster"
  location = var.region //
}

module "sql" {
  source = "./sql"
  database_version = "POSTGRES_12"
  name = "terraform-sql-instance"
  region = var.region
}
We check if the code is correct. We execute terraform init, plan and apply and wait until the base instance is made.
I won’t describe all of the Kubernetes resources, because this manual is not dedicated to this topic. I give links to the documentation where you can find a detailed description of every new recourse.
The last module, which we have to create is app module. It will contain all resources needed to deploy the app to GKE. There we’ll create:
- ConfigMap including environmental variables
- Service used to set our app to Pods
- Ingress used to set our app with public IP
- Deployment used to define what should be included in Pods, which are set by the service
- Database in previously created instance
To create those resource we need Kubernetes provider. We have to show the provider the cluster’s end-point and authorize with Google token and cluster’s certificate, to enable the provider to create all the resources as a part of our previously created cluster. It’s not difficult, as we already have everything that is necessary. In environment/main.tf file we add
provider "google" {
  version = "3.36.0"
  project = var.project_id
  region = var.region
  credentials = file(var.credentials)
}

data "google_client_config" "provider" {}

provider "kubernetes" {
  load_config_file = false
  host = "https://${module.cluster.cluster-endpoint}"

  token = data.google_client_config.provider.access_token
  cluster_ca_certificate = base64decode(module.cluster.cluster-certificate)
}

module "cluster" {
  source = "./cluster" //path to the folder where the module files are located
  name = "terraform-cluster"
  location = var.region //
}

module "sql" {
  source = "./sql"
  database_version = "POSTGRES_12"
  name = "terraform-sql-instance"
  region = var.region
}
As you can see we use the value from the cluster module. To make them available we have to declare them as outputs of the given module The environment/cluster we create outputs.tf file, thanks to which, we gain access to declared values in the main module.
output "cluster-endpoint" {
  value = google_container_cluster.cluster.endpoint
}

output "cluster-certificate" {
  value = google_container_cluster.cluster.master_auth[0].cluster_ca_certificate
}
After creating and configuring the provider we can make resources for the app. Let’s start with config map, database, service and ingress.
resource "kubernetes_config_map" "app-config-map" {
  metadata {
    name = "app-config-map"
  }

  data = {
    SPRING_DATASOURCE_USERNAME = "postgres"
    SPRING_DATASOURCE_PASSWORD = "postgres"
    SPRING_DATASOURCE_URL = "jdbc:postgresql://localhost:5432/${var.sql-database-name}"
  }
}

resource "google_sql_database" "app-database" {
  instance = var.sql-instance-name
  name = var.sql-database-name
}

resource "kubernetes_service" "app-service" {
  metadata {
    name = "app-service"
  }
  spec {
    type = "NodePort"
    selector = {
      app = "app"
    }
    port {
      port = 80
      protocol = "TCP"
      target_port = 8080
    }
  }
}

resource "kubernetes_ingress" "app-ingress" {
  metadata {
    name = "app-ingress"
  }
  spec {
    backend {
      service_name = kubernetes_service.app-service.metadata[0].name
      service_port = kubernetes_service.app-service.spec[0].port[0].port
    }
  }
  depends_on = [kubernetes_service.app-service]
}
Next in the same file we add the deployment of our application and all of the resources used by the deployment.
resource "kubernetes_secret" "credentials-secret" {
  metadata {
    name = "credentials-secret"
  }
  data = {
    "credentials" = file(var.credentials)
  }

}

resource "kubernetes_deployment" "app" {
  metadata {
    name = "app"
  }
  spec {
    replicas = 1
    selector {
      match_labels = {
        app = "app"
      }
    }
    template {
      metadata {
        labels = {
          app = "app"
        }
      }
      spec {
        container {
          name = "app"
          image = "gcr.io/terraform-example-project/app:latest"
          env_from {
            config_map_ref {
              name = "app-config-map"
            }
          }
        }
        container {
          name = "cloud-sql-proxy"
          image = "gcr.io/cloudsql-docker/gce-proxy:1.17"
          command = [
            "/cloud_sql_proxy",
            "-instances=${var.project_id}:${var.region}:${var.sql-instance-name}=tcp:5432",
            "-credential_file=/secret/credentials.json"
          ]
          security_context {
            run_as_group = 2000
            run_as_non_root = true
            run_as_user = 1000
          }
          volume_mount {
            mount_path = "/secret"
            name = "credentials"
            read_only = true
          }
        }
        volume {
          name = "credentials"
          secret {
            secret_name = "credentials-secret"
            items {
              key = "credentials"
              path = "credentials.json"
            }
          }
        }
      }
    }
  }
  depends_on = [kubernetes_service.app-service, kubernetes_secret.credentials-secret,
                kubernetes_config_map.app-config-map, google_sql_database.app-database]
}
We add app module to the main module environment/main.tf
module "app" {
  source = "./app"
  credentials = var.credentials
  project_id = var.project_id
  region = var.region
  sql-instance-name = module.sql.sql-instance-name
  depends_on = [module.cluster, module.sql]
}
Note that our app module its dependent on cluster and sql module, because we first have to create the cluster, in order to create resources in it. Similarly, first the instance has to be created to generate the base later.
We also add outputs.tf file in sql module and there we declare instance name
output "sql-instance-name" {
  value = google_sql_database_instance.instance.name
}
To create the deployment we use docker image. It has to be located in the Container Registry. To establish and push this image we’ll use the script build.sh, which is located in the repository. Gcloud has to be previously configured, so that the docker images can be pushed into the Container Registry.
build.sh
read -r -p "Enter project name: " project
image_name="gcr.io/${project}/app"
docker build -t  "${image_name}" .
docker push "${image_name}"

$SHELL
Here we use a simple docker file
FROM maven:3.6.0-jdk-11-slim AS build
COPY src /home/app/src
COPY pom.xml /home/app
RUN mvn -f home/app/pom.xml clean package

FROM openjdk:11-jre-slim
COPY --from=build /home/app/target/terraform-example-1.0-SNAPSHOT.jar /usr/local/lib/app.jar
EXPOSE 8080
ENTRYPOINT ["java","-jar","/usr/local/lib/app.jar"]
After establishing and correct pushing the image into the Container Registry we can proceed to final creation of the infrastructure. For downloading the docker images we need adequate authorization. Google Kubernetes Engine uses the Compute Engine default account for downloading the images. If not we have to give authorization
gcloud projects add-iam-policy-binding PROJECT_NAME --member serviceAccount:SERVICE_ACCOUNT_NAME@PROJECT_NAME.iam.gserviceaccount.com --role roles/storage.objectViewer
After executing all of the above mentioned steps in sequence: init, plan, apply, we wait until the app builds itself.
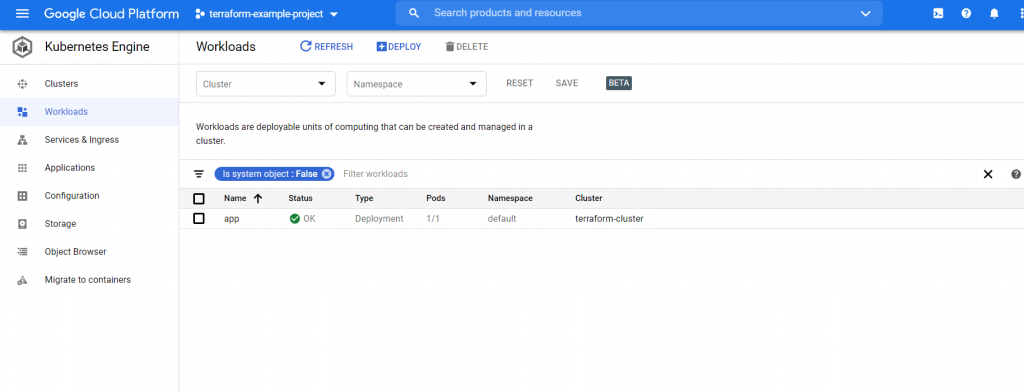
After the app has built itself correctly in the Kubernetes Engine in Workloads section we should be able to see our Deployment

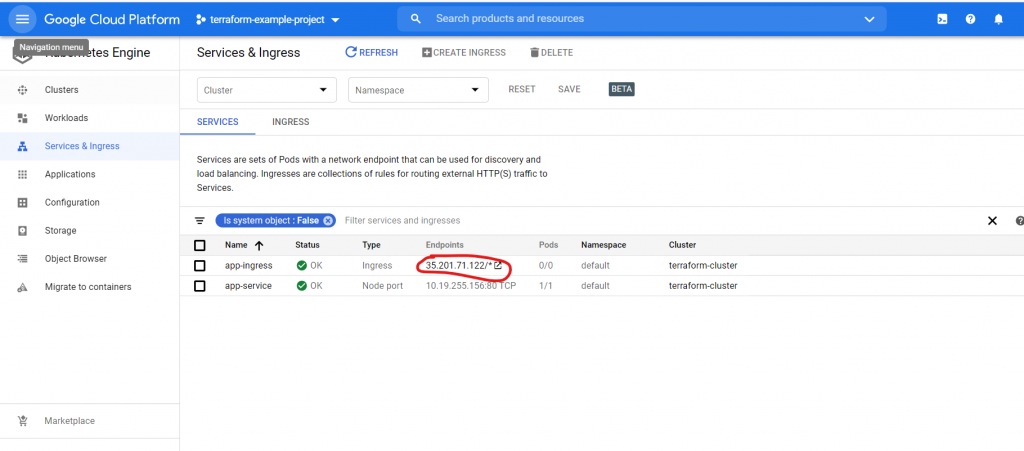
The functioning of the application we can check after entering the IP, which was created for our ingress.

Congratulations! This view means that the application is functioning correctly.
Summary
In this step-by-step tutorial you have come closer to knowing how to create a reusable infrastructure using Terraform modules. I hope you enjoyed the process and will use the knowledge you gained in your projects!
Check out other articles in the technology bites category
Discover tips on how to make better use of technology in projects


