
- Michał Stefaniuk
- Read in 5 min.
Process management – short introduction
Business process management is an approach for management that concentrates around optimizing business processes in various organizations.
To some extent we could possibly divide it into two channels – the business one, which would specify the “high level” aspects, and the technical one, which would be implementing them.
Using Camunda for business process automation begins with architecture and business decisions, but at some point there must be an underlying process definition that utilizes its logic according to the requirements.
- How to deploy a process that already has been modeled?
- How to launch it in the Camunda engine?
- How to query the engine and retrieve data about the processes and their instances?
In this article, we will showcase some basics regarding process management, which is a valuable insight on how to enable process automation with the Camunda using both Embedded and Standalone editions. Here, you can read more about these two approaches.
We also prepared a Camunda Tutorial: Managing a process instance in Embedded and Standalone editions.
For more Camunda Tutorials subscribe our YouTube Channel.
Process management in Embedded edition
For the first approach, let’s use a project that just got generated from Camunda initializer. You can generate it on your own following this service.
Deploying a process
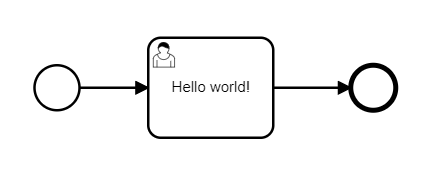
There are actually several ways to deploy a process into the embedded edition of Camunda. One of them could be through the REST API, if it’s only included in the project. However, we will start with this approach in the Standalone edition, so this time let’s go for something more “Spring Boot specific”. To deploy a process definition, just simply place it in the resources’ directory of your project. As we go forward, it is worth mentioning that this is only one of several techniques for process deployment that Camunda supports, but we will focus on other ways in the upcoming articles. For this tutorial’s purposes, we will be using a very simple process with just one human task.
After placing the process in the resources’ directory, just start the Spring Boot application and the deployment should be done. This is fairly simple and straightforward, though in a production environment this approach might not be the best to go for, as it requires rebooting your application every time you want to deploy a static resource.
Checking deployed processes in the engine
Now, that the process is deployed, let’s query the engine and see if it’s actually there. For this purpose we will need some custom implementation. First, let’s build a controller class which will receive our HTTP request.
@RestController
@RequestMapping("/camunda")
@RequiredArgsConstructor
class CamundaController {
    private final CamundaService camundaService;

    @GetMapping("/process-definitions")
    public List<ProcessDefinitionDto> getProcessDefinitions() {
        return camundaService.getDeployedProcessDefinitions();
    }
}
CamundaController is a REST controller class that for the moment will hold one method. This is supposed to retrieve information about the deployed process definitions through custom CamundaService.
@Service
@RequiredArgsConstructor
class CamundaService {
      private final RepositoryService repositoryService;

      public List<ProcessDefinitionDto> getDeployedProcessDefinitions() {
        return repositoryService
                .createProcessDefinitionQuery()
                .list()
                .stream()
                .map(ProcessDefinitionDto::of)
                .collect(toList());
    }
}
In this service we are implementing a method getDeployedProceessDefinitions() which does the job using Camunda’s RepositoryService. The returned collection, which will be a response for the HTTP GET request, is mapped to our custom model called ProcessDefinitionDto.
@Value
public class ProcessDefinitionDto {

    String id;
    String name;
    String key;
    String category;
    String tenantId;
    int version;

    public static ProcessDefinitionDto of(ProcessDefinition processDefinition) {
        ProcessDefinitionEntity processDefinitionEntity = (ProcessDefinitionEntity) processDefinition;
        return new ProcessDefinitionDto(
                processDefinitionEntity.getId(),
                processDefinitionEntity.getName(),
                processDefinitionEntity.getKey(),
                processDefinitionEntity.getCategory(),
                processDefinitionEntity.getTenantId(),
                processDefinitionEntity.getVersion()
        );
    }
}
Now if we follow these steps and hit the /process-definitions endpoint of your application, we should be able to see the information about the deployed process definitions.
   {
        "id": "camunda-intro-process:1:f27906d2-a24a-11ec-ab95-f8a2d6ea092a",
        "name": null,
        "key": "camunda-intro-process",
        "category": "http://bpmn.io/schema/bpmn",
        "tenantId": null,
        "version": 1
    }
Starting a process
To start our deployed process we will implement another method in the CamundaController, although this time it will handle POST requests.
@PostMapping("/processes/{processKey}/start")
@ResponseStatus(HttpStatus.NO_CONTENT)
public void startProcess(@PathVariable String processKey) {
    camundaService.startProcess(processKey);
}
This will also require another custom method in the CamundaService class.
public void startProcess(String processKey) {
    runtimeService.startProcessInstanceByKey(processKey);
}
The startProcess() method will use one of the RuntimeService’s features, which is starting the process instance by key. Now if we send a HTTP Post request on /process/processKey/start endpoint then we will get a 204 No Content response and the process should start.
Checking running instances
Now that your process is running, we can also verify that by querying the engine again. Just like before, we are going to need another controller method and a corresponding service method.
@GetMapping("/tasks/active")
public List<TaskDto> getProcessInstances() {
    return camundaService.getActiveTasks();
}
public List<TaskDto> getActiveTasks() {
return taskService.createTaskQuery()
.active()
.list()
.stream()
.map(TaskDto::of)
.collect(toList());
}This time our controller will receive a GET request. Upon receiving it, the service method getActiveTasks() will return the information about the active and running processes.
It is utilized through Camunda’s TaskService and our mapping for a custom entity called TaskDto.
@Value
public class TaskDto {

    String id;
    String name;
    String assignee;
    Date created;
    String processInstanceId;
    String taskDefinitionKey;

public static TaskDto of(Task task) {
        return new TaskDto(
                task.getId(),
                task.getName(),
                task.getAssignee(),
                task.getCreateTime(),
                task.getProcessInstanceId(),
                task.getTaskDefinitionKey()
        );
    }
}
Process management in Standalone edition
Now let’s jump into the embedded edition of Camunda. For this tutorial’s purposes we will be using Camunda BPM Run. To get it up and running in your local environment just follow this tutorial.
Deploying a process
To deploy a process definition, we will send an HTTP POST request. If we configure it properly, the process should get deployed.
POST /rest/deployment/create HTTP/1.1
Host: localhost:8085
Content-Type: multipart/form-data;
Content-Disposition: form-data; name="upload"; filename="path-to-your-file/process.bpmn"
Content-Type: <Content-Type header here>
The response for a correct deployment should look like the following.
{
    "links": [
        {
            "method": "GET",
            "href": "http://localhost:8085/rest/deployment/374fb74b-a2ee-11ec-a266-f8a2d6ea092a",
            "rel": "self"
        }
    ],
    "id": "374fb74b-a2ee-11ec-a266-f8a2d6ea092a",
    "name": null,
    "source": null,
    "deploymentTime": "2022-03-13T17:54:15.552+0100",
    "tenantId": null,
    "deployedProcessDefinitions": {
        "camunda-intro-process:2:3768bd8d-a2ee-11ec-a266-f8a2d6ea092a": {
            "id": "camunda-intro-process:2:3768bd8d-a2ee-11ec-a266-f8a2d6ea092a",
            "key": "camunda-intro-process",
            "category": "http://bpmn.io/schema/bpmn",
            "description": null,
            "name": null,
            "version": 2,
            "resource": "process.bpmn",
            "deploymentId": "374fb74b-a2ee-11ec-a266-f8a2d6ea092a",
            "diagram": null,
            "suspended": false,
            "tenantId": null,
            "versionTag": null,
            "historyTimeToLive": null,
            "startableInTasklist": true
        }
    },
    "deployedCaseDefinitions": null,
    "deployedDecisionDefinitions": null,
    "deployedDecisionRequirementsDefinitions": null
}
Checking deployed processes in the engine
Now let’s find out if the process got registered in the Camunda engine. To achieve that, we will send a GET request towards our standalone local instance.
GET /rest/deployment HTTP/1.1
Host: localhost:8085
Content-Type: multipart/form-data;
The successful response should return the information about existing processes definitions, amongst which we should find our freshly deployed process.
[
    {
        "links": [],
        "id": "374fb74b-a2ee-11ec-a266-f8a2d6ea092a",
        "name": null,
        "source": null,
        "deploymentTime": "2022-03-13T17:54:15.552+0100",
        "tenantId": null
    }
]
Starting a process
Now, once our process is there, we are ready to run it. As you can guess by now, this will be done through another HTTP request.
POST /rest/process-definition/key/camunda-intro-process/start HTTP/1.1
Host: localhost:8085
Content-Type: application/json
A part of the url is a parameter that needs to contain the correct key of the process that you want to run. The successful response should return the following information.
{
    "links": [
        {
            "method": "GET",
            "href": "http://localhost:8085/rest/process-instance/4b3c9e2e-a2ef-11ec-a266-f8a2d6ea092a",
            "rel": "self"
        }
    ],
    "id": "4b3c9e2e-a2ef-11ec-a266-f8a2d6ea092a",
    "definitionId": "camunda-intro-process:2:3768bd8d-a2ee-11ec-a266-f8a2d6ea092a",
    "businessKey": null,
    "caseInstanceId": null,
    "ended": false,
    "suspended": false,
    "tenantId": null
}
Checking running instances
The last step would be to verify if the process is indeed running. This time we will also do it through an HTTP request.
GET /rest/process-instance?active=true HTTP/1.1
Host: localhost:8085
In response, we should be able to notice that one of the active process instances is indeed the one that we just started.
[
    {
        "links": [],
        "id": "4b3c9e2e-a2ef-11ec-a266-f8a2d6ea092a",
        "definitionId": "camunda-intro-process:2:3768bd8d-a2ee-11ec-a266-f8a2d6ea092a",
        "businessKey": null,
        "caseInstanceId": null,
        "ended": false,
        "suspended": false,
        "tenantId": null
    }
]
Standalone vs. Embedded
Going for the embedded edition of Camunda makes the process management very simple. It only requires some basic knowledge of Java and Spring Boot development and of course some fundamental knowledge about the Java API of Camunda engine.
Although it requires some custom coding, it simply provides developers a possibility to implement complex solutions. These are adjustable to the needs of the business, such as specifying response structures for the application’s clients.
On the other hand, there are also standalone editions like Camunda BPM Run. Basically, it provides all the features that we could explore in the embedded edition. However, it does not require any coding, therefore maintaining such a system might be a little bit easier.
Having said that, we need to note that the bottleneck of this approach is that there is less flexibility, if we are looking for a custom solution around the engine itself.
Summary
This was basically just an introduction to what kind of features and functionalities Camunda provides when it comes to process management. All of them are referenced in the documentation of Camunda engine. Regardless of the edition, the business goal can be reached in various approaches.
If you are not sure which one to choose, we can help you!
Tell us about your needs, and we will recommend the best option for you!