

- Karol Sobota
- Read in 7 min.
When implementing an application, we all eventually hit a point where we have to face performance problems. Even a well-written system when confronted with a heavy load can stop working properly. One of the more popular ways to deal with such problems is to store frequently queried data in a cache.
In this article, we will discuss how to use Caching in the Spring Boot library.
A few words about the Cache mechanism
In simple terms, Caching is a mechanism that is responsible for storing some data in RAM. Access to this main memory is much faster than to resources such as hard drives. This makes querying the data down to the range of a few milliseconds. However, if this solution had no drawbacks, then classic databases would be replaced by cache memories, and the applications we use would never “catch breathlessness” again. The limitation that makes such a scenario still unrealistic is the small size of RAM. Thus the small amount of data we can put in it. Filling this main memory with a large amount of data can cause an even greater performance drop because the system also uses it for running the current operations.
What data should be cached?
Unfortunately, there is no clear answer to this question. As a rule of thumb, it is data that is frequently used and infrequently changed. Otherwise, the need to constantly update the data, both in the database and in the cache, may become more costly than retrieving this data without a caching mechanism.
An additional element that we need to pay attention to when using this mechanism is to ensure that the cached data is up-to-date. Even if the data is not changed often, the longer it is in the cache, the greater the chance that it will be overdone. If such a situation occurs, then the outdated data must be removed from the cache. When the next time the data is queried, the current version of the data is retrieved in the classic way, and then put back into the cache. Such an operation is referred to as Cache Invalidation.
In addition to the mentioned expiration situation, cached data can be deleted in several other cases. Even if we assume that the data that has been placed in the cache will be used frequently, there may be an interruption in the demand for this data. The solution to this problem is to periodically remove from memory cache all data that belong to a specific set. It will release computing resources. On the other hand, when the cache implementation specifies a maximum number of elements, such a cache is often quickly filled. Then, in order for another element to be added, one of those already in it must be invalidated. Good candidates in such a situation for invalidation are those data that have been used the longest or least frequently.
Caching in the Spring Boot library
Let’s take a look at some code. To start using the caching mechanism in the Spring Boot library, you must place the following dependency in the pom.xml file:
<dependency>
	<groupId>org.springframework.boot</groupId>
	<artifactId>spring-boot-starter-cache</artifactId>
	<version>2.6.3</version>
</dependency>
The latest version of the library, you can find at this link.
To enable caching add the @EnableCaching annotation over any configuration class. An example configuration might look like the following:
	@Configuration
	@EnableCaching
	public class CacheConfiguration {

		@Bean
		public CacheManager cacheManager() {
			return new ConcurrentMapCacheManager("posts");
		}
	}
However, by adding the spring-boot-starter-cache annotation, the ConcurrentMapCacheManager bean is automatically registered in the context after using the @EnableCaching annotation. Therefore, you can skip the manual declaration of this bean. You can customize it by implementing the CacheManagerCustomizer interface, as shown in the following example:
@Component
	@EnableCaching
	public class CacheCustomizer implements CacheManagerCustomizer<ConcurrentMapCacheManager> {

		@Override
		public void customize(ConcurrentMapCacheManager cacheManager) {
			cacheManager.setCacheNames(List.of("posts"));
		}
	}
Cache annotations
Next, we can start using the caching mechanism by making appropriate use of the annotations provided with the spring-boot-starter-cache dependency. These annotations are respectively:
@EnableCaching
As presented earlier, this annotation allows us to manage the cache using the other annotations.
@Cacheable
Adding this annotation allows the result returned by the selected method to be stored in the cache. Each subsequent call to the method with the same arguments will be skipped. The result therefore will be returned based on the information stored during the first call.
In addition, the annotation provides the possibility of conditional caching, thanks to the use of condition and unless parameters. Verification of the condition when using the condition parameter takes place before the method is called. Consequently, one of the method parameters can be verified. When using the unless parameter, it is possible to verify the result of the function, by referring to the #result object.
In the following example, the value returned from the getPost method will be cached if the input parameter is longer than 3 characters, and if the response does not contain the digit 0.
@Cacheable(value = "posts", key = "#id",
            condition = "#value.length() > 3",
            unless = "#result.contains(\"0\")")
    public String getPost(Integer id, String value) {
        log.debug("Inside get post method");
        int randomNumber = (int) Math.round(Math.random()); // 0 or 1
        return value + " " + randomNumber;
    }
@CachePutAdnotation
The @CachePutAdnotation allows you to update the cached value that corresponds to the passed arguments. Compared to the @Cacheable annotation, a method marked with @CachePut will always be executed. Even if the new value passed in the method argument, is equal to the value stored in memory.
  @CachePut(value = "posts", key = "#id")
    public String updatePost(Integer id, String value) {
        log.debug("Inside update post method");
        int randomNumber = (int) Math.round(Math.random()); // 0 or 1
        return value + " " + randomNumber;
}
@CacheEvict
Adding this annotation allows you to remove entries from the cache. The deletion can be either conditional, by matching the method arguments to a specific entry, or global, by setting the parameter allEntries = true.
@CacheEvict(value = "posts", key = "#id")
    public void deletePost(Integer id, String value) {
        log.debug("Inside evict specific post method");
    }

    @CacheEvict(value = "posts", allEntries = true)
    public void deleteAllPosts() {
        log.debug("Inside evict all posts method");
}
@Caching
This annotation allows you to use multiple annotations of the same type (@Cacheable, @CachePut and @CacheEvict) over a single method. This makes it possible, for example, to cache values in several different sets at the same time.
@Caching(cacheable = {
     @Cacheable(value = "posts", key = "#id"),
     @Cacheable(value = "texts", key = "#id")
    })
    @Cacheable(value = "posts")
    public String getPostText(Integer id, String value) {
        log.debug("Inside get post text method");
        return value + "text";
}
@CacheConfig
With this annotation, we can globally specify values for all methods within a specific class.
	@CacheConfig(cacheNames = "posts")
	public class PostService {
	}
Cache architecture patterns – choose carefully
We already know that adding caching to our applications, can improve responsiveness. However, in order to take full advantage of this mechanism, we need to implement it properly in our system.
Because IT systems need to be able to perform more and more functions, they are increasingly being developed in microservices architecture. One of the most important issues to pay attention to when using this architecture is where in the system the cache mechanism should be placed. In view of the above, let’s look at two popular architectural patterns of cache usage.
Embedded cache
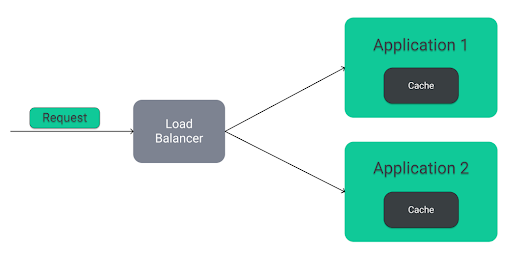
The first very popular, and simplest pattern is Embedded cache. As we can see in the diagram above, this pattern involves embedding the cache directly in the application. It is associated with fast and easy implementation. However, the disadvantage of this solution is the situation in which both applications operate on the same or similar set of data. Then some of the information stored in the caches of both applications is repeated, leading to redundant RAM consumption. This problem becomes particularly evident in microservices architecture, where individual applications can be replicated, leading to duplication of most information.
In some cases, in order for an application to handle a given request, it must first acquire some information from another application in the system. Communication between these applications then occurs, which can also be optimized by imposing a cache layer. This layer, however, can be imposed both on the side of the application making the request:
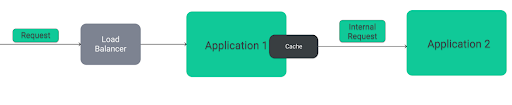
As well as on the receiving side of the request:

This raises the question, “Which option should I choose?”
In the first approach, these situations will be:
- retrieving data that is not in the cache (sending a request from application 1 to application 2)
- invalidation of data in the cache (sending an event from application 2 to application 1).
In contrast, the second approach will be:
- propagation of each request from application 1 to application 2
As you can see, with both solutions, communication between the two applications cannot be fully avoided. Since retrieving information is done much more often than updating it, communication will not take place as often in the case of the first solution. This will have a positive effect on the performance of the entire system.
Client-Server Cache

The solution to some of the problems outlined in the first architectural pattern is to use a client-server architecture. Under this architecture, the cache is separated as a dedicated application. This makes it possible for multiple applications to use the same data. In addition, if we use this architecture, then no matter in which application the data gets updated, cache invalidation always takes place in the same place. This situation reduces network traffic throughout the system, which in turn has a positive effect on its performance.
Caching using Redis – implementation in Spring Boot
One of the more popular tools that can be used to implement caching in a client-server architecture is a database called Redis. Thanks to the fact that the data stored in this database is in RAM, it has a high speed and can therefore be used as a cache. Therefore, we will look at the implementation of this tool in the Spring Boot library.
By default, we start the implementation by adding the appropriate dependency to the pom.xml file:
<dependency>
			<groupId>org.springframework.boot</groupId>
			<artifactId>spring-boot-starter-data-redis</artifactId>
		</dependency>
Next, we replace the standard bean type CacheManager with the following configuration:
@Bean
    public RedisCacheConfiguration cacheConfiguration() {
        return RedisCacheConfiguration.defaultCacheConfig()
                .entryTtl(Duration.ofMinutes(60))
                .disableCachingNullValues()
                .serializeValuesWith(RedisSerializationContext.SerializationPair
                        .fromSerializer(new GenericJackson2JsonRedisSerializer()));
}
Note: The value passed within the serializeValuesWith method is responsible for enabling the storage of objects of all classes in the Redis database. By default, this tool allows saving only objects of classes that implement the Serializable interface.
In addition, individual caches, can be configured as shown in the following snippet:
    @Bean
    public RedisCacheManagerBuilderCustomizer redisCacheManagerBuilderCustomizer() {
        return (builder) -> builder
                .withCacheConfiguration(
                        "posts",
                        cacheConfiguration().entryTtl(Duration.ofMinutes(10)));
}
By default, the connection to the Redis database is made at localhost:6379. However, we can specify these values by adding the following values in the application.properties file:
spring.redis.host=localhost
spring.redis.port=6379
Or in the application.yaml file:
spring:
  redis:
    host: "localhost"
porta: 6379
At this stage, our application is fully configured and we can move on to try out the cache operation using Redis. To do this, we start an instance of the Redis database can be done by preparing a docker-compose.yaml file with the following content:
version: "3.8"
services:

  redis:
    image: redis
    container_name: redis
    ports:
      - 6379:6379
Then we launch our application and call the request:
GET http://localhost:8080/posts/1/testValue
Then, the value we received in the response was also stored in the Redis cache, as shown in the figure below:
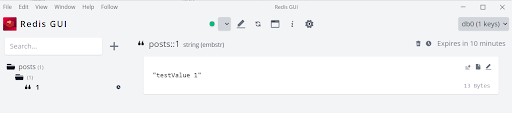
Redis visualized data using the Redis GUI tool.
Summary
I hope this tutorial will help you understand Cache and data storage more, but it is also worth bearing in mind that cache has its drawbacks too. Before undertaking an implementation you should consider whether one of the following situations exists in your case:
- Redundant use of cache – if the chosen service works fast enough without adding cache, implementing this mechanism will only reduce the readability of our code
- Caching data with high dynamics of change – the cost associated with updating data in cache, may outweigh the gain from using cache
- Masking bad implementation – Services that cause performance problems should be optimized before we decide to layer cache on them. Otherwise, the cache may not solve the problem, as even single queries taking a very long time will block the performance of the whole system.
- Increasing the memory allocated to the cache – The cache has a capacity and a validity period for the data that is stored in it. Before we decide to configure the cache to store more data, we should try to adjust the invalidation algorithms. The queries stored in the cache should, as much as possible, correspond to the queries that are frequently received by our application.
Check out other articles in the technology bites category
Discover tips on how to make better use of technology in projects