- Krystian Bajun
- Read in 5 min.
The article presents the basic configuration of Apache Kafka on a Docker container and a microservice built in the Spring Boot framework. This article is a good introduction to understand how applications interact with each other. In our example, we will send messages using the JSON format and then display them.
We will create a simple application simulating banking processes, where the user will be able to withdraw a certain amount of funds. We will use the REST interface. Kafka’s task will be to queue orders.
Note the following material is intended for readers who are familiar with the basics of Kafka and Docker. If you hear about them for the first time, I encourage you to read: https://devapo.io/blog/meet-apache-kafka-a-streaming-data-platform/ and documentation https://docs.docker.com/.
We also offer custom development services, so you can take advantage of Kafka’s potential without having your in-house IT team – for this purpose, contact us.
Let’s build a Kafka container
In the main catalogue of the project, let’s create the docker-compose.yml file. It is responsible for running multiple containers at the same time and automates their creation. The images appear in a specific order and time, which is important to us as Zookeeper should launch first.
version: '3'
services:
  zookeeper:
    image: wurstmeister/zookeeper
    ports:
    - "2181:2181"
  kafka:
    image: wurstmeister/kafka
    ports:
    - "9092:9092"
    environment:
      KAFKA_ADVERTISED_HOST_NAME: 127.0.0.1
      KAFKA_ZOOKEEPER_CONNECT: zookeeper:2181
      KAFKA_AUTO_CREATE_TOPICS_ENABLE: 'false'
Now let’s look at the above configuration. We created two docker instances and called them zookeeper and kafka. We can download the image successively from https://hub.docker.com/r/wurstmeister/zookeeper and https://hub.docker.com/r/wurstmeister/kafka. We encourage you to read the documentation.
Note the configuration of the second container:
KAFKA_ADVERTISED_HOST_NAME → enter the IP of the docker host, in our case we do it locally, so enter IP localhost.
KAFKA_ZOOKEEPER_CONNECT → give the port on which the zookeeper cluster is monitoring
KAFKA_AUTO_CREATE_TOPICS_ENABLE: → we don’t want Kafka to create topics automatically, so we set the value to ‘false’. Later in the article, we will create them ourselves, using the Spring Boot application.
We have configured Kafke to run on a single Node.
To start the containers, just enter the docker-compose up command.
Let’s build Spring Boot applications
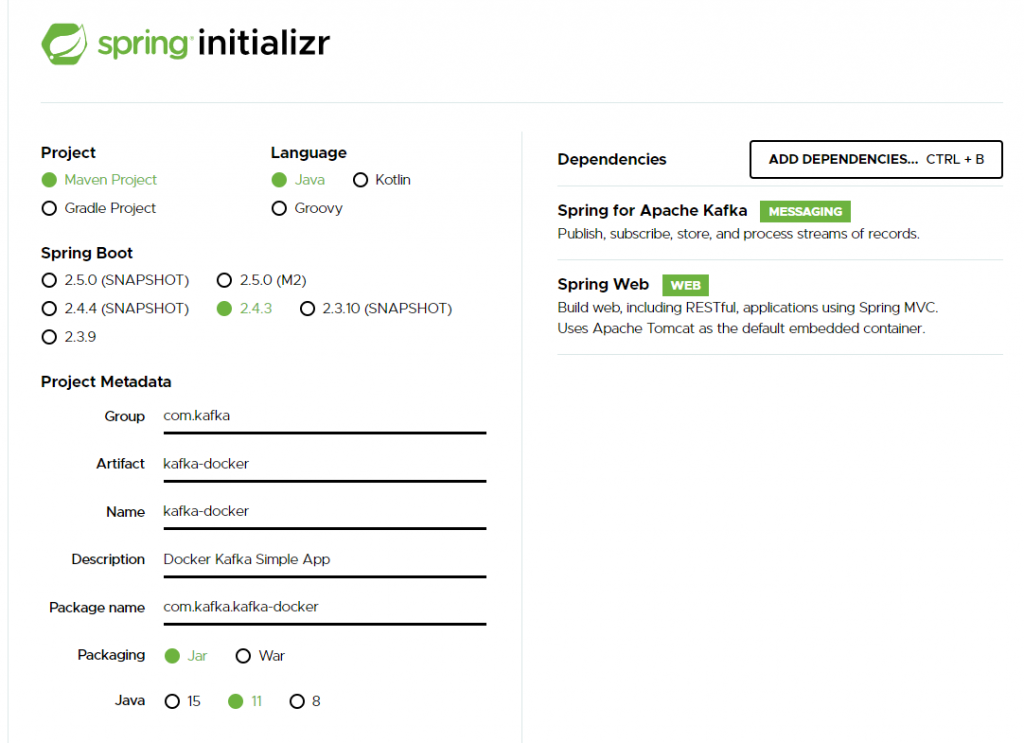
The fastest and easiest way to build a simple application based on the Spring Boot framework is to use spring initializer. It offers a quick way to select the dependencies we need in a project. In our case, it will be Spring for Apache Kafka and Spring Web.
Go to the website https://start.spring.io/, then follow the instructions.
Let’s configure the Application
In the finished project, we create the application.yml file in src/main/java/resources. We will define there the configuration values necessary for our project.
server:
  port: 8081
spring:
  kafka:
    consumer:
      group-id: group-1
      auto-offset-reset: earliest
      bootstrap-servers: localhost:9092
At this point, we encourage you to read the official documentation released by Spring on the Apache Kafka configuration:
https://docs.spring.io/spring-kafka/reference/html/
We have created two blocks of the kafka and topic properties. Let us now move on to explaining them. The group-id attribute is a string of characters that uniquely identifies the group of consumer processes this consumer belongs to, let’s call it: group-1.
Setting the value to earliest in auto-offset-reset will cause consumers to read offset messages starting as early as possible, when no other offset exists for that consumer.
POJO class
Now let’s reate a POJO class responsible for deserialization. We will use the Jackson library for this. This will allow us to map the REST sent values to the java object.
package com.kafka.example.app.kafka;

import com.fasterxml.jackson.annotation.JsonProperty;

public class Account {

    private String holder;
    private String funds;

    public Account(
            @JsonProperty String holder,
            @JsonProperty String funds) {
        this.holder = holder;
        this.funds = funds;
    }

    public Account() {
    }

    public String getHolder() {
        return holder;
    }

    public void setHolder(String holder) {
        this.holder = holder;
    }

    public String getFunds() {
        return funds;
    }

    public void setFunds(String funds) {
        this.funds = funds;
    }
Producer Configuration Class
Now we will create a new Producer class. It will be another class with the @Configuration annotation, where we will define the producer’s settings, i.e. the kafka client responsible for publishing records to the Kafka cluster.
import org.apache.kafka.clients.admin.NewTopic;
import org.apache.kafka.clients.producer.ProducerConfig;
import org.apache.kafka.common.serialization.StringSerializer;
import org.springframework.boot.autoconfigure.kafka.KafkaProperties;
import org.springframework.context.annotation.Bean;
import org.springframework.context.annotation.Configuration;
import org.springframework.kafka.core.DefaultKafkaProducerFactory;
import org.springframework.kafka.core.KafkaTemplate;
import org.springframework.kafka.core.ProducerFactory;
import org.springframework.kafka.support.serializer.JsonSerializer;

import java.util.HashMap;
import java.util.Map;


@Configuration
public class Producer {

    final KafkaProperties kafkaProperties;

    public Producer(KafkaProperties kafkaProperties) {
        this.kafkaProperties = kafkaProperties;
    }


    @Bean
    public Map<String, Object> producerConfiguration() {
        Map<String, Object> properties = new HashMap<>(kafkaProperties.buildProducerProperties());
        properties.put(ProducerConfig.KEY_SERIALIZER_CLASS_CONFIG, StringSerializer.class);
        properties.put(ProducerConfig.VALUE_SERIALIZER_CLASS_CONFIG, JsonSerializer.class);
        return properties;
    }

    @Bean
    ProducerFactory<String, Object> producerFactory() {
        return new DefaultKafkaProducerFactory<>(producerConfiguration());
    }

    @Bean
    KafkaTemplate<String, Object> kafkaTemplate() {
        return new KafkaTemplate<>(producerFactory());
    }

    @Bean
    public NewTopic topic() {
        return new NewTopic("transaction-1", 2, (short) 1);
    }
}
We used the KafkaTemplate instance. It is a template used to perform high-level operations. We are going to use it to send messages to Kafka.
Now let’s discuss Producer Configurations. We do it in producerConfiguration by filling the <String, Object> map with appropriate values. For this we will use the kafkaProperties instance that has been injected by the constructor. Next, we overwrite the default Kafka serializer. The manufacturer will serialize the keys as Strings using the kafka library StringSerializer and JSON values using JsonSerializer. This is fully provided and supported by Spring Kafka.
Now let’s discuss the topic field that we created by the NewTopic Bean injection. The first parameter is responsible for the name of the new topic, the second for the number of partitions to be divided into, and the third is the replication ratio. Leaving it at level , we will use one node.
Consumer Configuration Class
Now let’s create a configuration class responsible for consuming messages from the Kafka cluster.
package com.kafka.example.app.kafka.Configuration;

import org.apache.kafka.common.serialization.StringDeserializer;
import org.springframework.boot.autoconfigure.kafka.KafkaProperties;
import org.springframework.context.annotation.Bean;
import org.springframework.kafka.config.ConcurrentKafkaListenerContainerFactory;
import org.springframework.kafka.core.ConsumerFactory;
import org.springframework.kafka.core.DefaultKafkaConsumerFactory;
import org.springframework.kafka.support.serializer.JsonDeserializer;

@org.springframework.context.annotation.Configuration
public class Consumer {

    final KafkaProperties kafkaProperties;

    public Consumer(KafkaProperties kafkaProperties) {
        this.kafkaProperties = kafkaProperties;
    }


    @Bean
    ConsumerFactory<String, Object> consumerFactory() {
        final JsonDeserializer<Object> jsonDeserializer = new JsonDeserializer<>();
        jsonDeserializer.addTrustedPackages("*");
        return new DefaultKafkaConsumerFactory<>(kafkaProperties.buildConsumerProperties(), new StringDeserializer(), jsonDeserializer);
    }

    @Bean
    ConcurrentKafkaListenerContainerFactory<String, Object> kafkaListenerContainerFactory() {

        ConcurrentKafkaListenerContainerFactory<String, Object> concurrentKafkaListenerContainerFactory
                = new ConcurrentKafkaListenerContainerFactory();
        concurrentKafkaListenerContainerFactory.setConsumerFactory(consumerFactory());

        return concurrentKafkaListenerContainerFactory;
    }

}
As before, let’s create the Consumer class. Let’s inject a kafkaProperties instance through the constructor. Next, let’s discuss the deserializer configurations. We have created a ConsumerFactory that will be used by the KafkaListenerCointanerFactory object. We have defined that KafkaListener will handle messages in JSON format.
The addTrustedPackages functionality is responsible for determining trusted packages. For our needs, we will not define them, so ‘*’ means that we trust all packages.
Kafka Controler
In this part we will create a rest controller to handle the POST operation, and pass the message to the kafka topic. Next, we will use the @KafkaListener annotation.
import org.apache.kafka.clients.consumer.ConsumerRecord;
import org.slf4j.Logger;
import org.slf4j.LoggerFactory;
import org.springframework.kafka.annotation.KafkaListener;
import org.springframework.kafka.core.KafkaTemplate;
import org.springframework.messaging.handler.annotation.Payload;
import org.springframework.web.bind.annotation.PostMapping;
import org.springframework.web.bind.annotation.RequestBody;
import org.springframework.web.bind.annotation.RequestMapping;
import org.springframework.web.bind.annotation.RestController;


@RequestMapping ("/api/kafka")
@RestController
public class Controller {

    final KafkaTemplate kafkaTemplate;


    Logger logger = LoggerFactory.getLogger(Controller.class);

    public Controller(KafkaTemplate kafkaTemplate) {
        this.kafkaTemplate = kafkaTemplate;
    }

    @PostMapping
    public String sentMessage(@RequestBody Account account) {
        this.kafkaTemplate.send("transaction-1", new Account(account.getHolder(), account.getFunds()));

        return "Hello World!";
    }

    @KafkaListener(topics = "transaction-1")
    public void listener(@Payload Account account,  ConsumerRecord<String, Account> cr) {
        logger.info("Topic [transaction-1] Received message from {} with {} PLN ", account.getHolder(), account.getFunds());
        logger.info(cr.toString());
    }


}
We defined the controller using Spring @RestController and @RequestMapping annotations – setting the endpoint to api/kafka.
In the next step we will use the LoggerFactory class from the slf4j library. It is a logger production tool that will help us better understand how the topic works.
The sendMessage method is responsible for sending a new Account type object to the Kafka cluster, in our application we have defined one topic called transation-1.
Now let’s discuss the listener method, we used the @KafkaListener annotation in it, we used it to define the message receiver in the topic transaction-1.
Then we will log the message that was summarized by topic transation-1 and display the data provided by the ConsumerRecord class, in which we will find the topic name and partition number from which the record is received and an offset pointing to the record in the Kafka partition.
Launching the application
Let’s start by entering the docker-compose up command in the main project folder.
We can see that the container with Kafka and Zookeeper has started.
C:\Users\Krystian\Desktop\kafka-spring>docker-compose up
Starting kafka-spring-example-app_kafka_1 ... done
Starting kafka-spring-example-app_zookeeper_1 ... done
Attaching to kafka-spring-example-app_kafka_1, kafka-spring-example-app_zookeeper_1
Then we run our spring application. Please note the message below. We can see that the example-group, according to our assumptions, assigned two partitions transaction-1-0 and transaction-1-1.
2021-02-1 08:08:21.483 INFO 67372 --- [ntainer#0-0-C-1] o.s.k.l.KafkaMessageListenerContainer : transation-topic: partitions assigned: [transaction-1-0, transaction-1-1]
Now let’s perform the POST operation
POST https://localhost:8081/api/kafka
Content-Type: application/json
Accept: application/json
{
"holder": "Tonny",
"funds": "2000"
}
The output should look like this
2021-02-19 08:12:37.024 INFO 67372 --- [ntainer#0-0-C-1] com.kafka.example.app.kafka.Controller : Topic [transaction-1] Received message from Tonny with 2000 PLN
2021-02-19 08:12:37.024 INFO 67372 --- [ntainer#0-0-C-1] com.kafka.example.app.kafka.Controller : ConsumerRecord(topic = transaction-1, partition = 0, leaderEpoch = 0, offset = 2, CreateTime = 1613718756987, serialized key size = -1, serialized value size = 33, headers = RecordHeaders(headers = [], isReadOnly = false), key = null, value = com.kafka.example.app.kafka.Account@2538a849)
We can see that the message we sent earlier went to the first topic as first. You should pay attention to the next log, the topic and the allocated partition in particular.
Summary
In the above article, I presented a simple application illustrating how to configure Kafka using spring and docker compose. I hope you will find my tutorial useful.
Check out other articles in the technology bites category
Discover tips on how to make better use of technology in projects