

- Michał Rasztabiga
- Read in 11 min.
Modern APIs use various techniques to provide fast, robust and secure access to their resources. Apart from obvious aspects like authentication and authorization rules implementation, rate limiting is definitely something that you may need to consider if you want to gain control over how end users use your software.
Read this article to understand use cases of rate limiting and see different ways to implement.
What is rate limitiing?
Rate limiting is not a new term in the IT industry. Actually, it has already been successfully implemented in many leading programming languages. It is a proces of limiting the access to a resource according to the adopted algorithm. The aim is to establish a limit on the frequency with which a user can repeat a request within a specified time frame.
Here are some widely used rate limiting algorithms:
- concurrency limit
- token bucket limit
- fixed window limit
- sliding window limit
All of the above will be discussed in the next part of this article.
Nowadays, APIs often have to work under high load, handling multiple requests from different user sessions. No control over requests sent to the server can easily lead to trouble. Check this article to avoid it!
Why Rate Limiting is Essential: Common Use Cases
There are at least a couple of reasons, but security first 😉
Unprotected public endpoints can be a tasty morsel for attackers and bots. A hacker can try to repeatedly call our endpoint, pushing it to its limits and causing our service to be unavailable to other users (DoS – Denial of Service attack).
Prevent Subscriber Overuse
Antoher point is important for business side, especially in tech companies that often sell their products based on different types of paid, renewable subscriptions. These can offer a smaller or wider set of features depending on the price. Rate limiting can be a technical solution used to prevent subscribers from overusing protected API endpoint/s overusing before upgrading or renewing their subscription to the one that can extend the limit threshold.
Beneficial also for customers!
On the other hand, clients accessing paid APIs (especially the ones designed in a pay-as-you-go model without cost limit) can also benefit from adopting rate limiting. A part of internal software that interacts with an external API can detect that it is reaching a well-known accepted limit and block such requests before even reaching the paid resource endpoint, preventing unintentional extra costs.
Effective Server Load Management
Additionally, if the average load of particular endpoints is correctly measured or at least estimated (taking into account our infrastructure bottlenecks) rate limiting rules can also prevent overloading of our servers. A common scenario will be a database that can handle only a particular, safe number or requests before starting to produce errors that we want to avoid.
Implementation – the complicated way – .NET custom middleware rate limiting
While .NET is still evolving there are still many gray factors of the platform that could be improved.
Until .NET 7 there was no built-in rate limiting solution for C# developers. Software teams had to deal with this problem on their own. The most low-level (but also giving the most control) way of implementing rate limiting was to use a custom middleware.
Middleware is a powerful mechanism that can be used to plug custom code into the http pipeline processing to achieve an expected effect.
Implement .NET rate limiting using a custom middleware approach
Below sample uses only a fixed window limit algorithm approach with an IP address tracking to simplify the implementation. Additionally, in-memory cache used in this code snippets should be normally replaced with distributed cache i.e. Redis.
Firstly, we need a decorator that can be used on endpoints that needs rate limiting:
namespace RateLimiting.RateLimiting
{
 /// <summary>
 /// A rate limiting attribute that can be applied on endpoints that needs  /// control
 /// </summary>
 [AttributeUsage(AttributeTargets.Method)]
 public class LimitAccess: Attribute
 {
 /// <summary>
 /// Time window in seconds
 /// </summary>
 public int TimeWindowSeconds { get; set; }
 /// <summary>
 /// Maximum allowed number of requests per time window
 /// </summary>
 public int MaxRequests { get; set; }
 }
}
Decorator is designed to be used on the method level. Next, we need an object that will be a representation of access attempt (to be stored in cache later):
namespace RateLimiting.RateLimiting
{
 /// <summary>
 /// Object representing cache entry holding data needed for access control  /// </summary>
 public class AccessHistory
 {
 /// <summary>
 /// Last successful resource access time
 /// </summary>
 public DateTime LastAccessTime { get; set; }
 /// <summary>
 /// Number of already handled requests in a timeframe
 /// </summary>
 public int NumberOfHandledRequests { get; set; }
 }
}
We also need some kind of a service layer that will take care of cache interactions:
/// <summary>
 /// Service for accessing cached access history entries related to path and ip   /// address pairs
 /// </summary>
 public interface IIPAccessHistoryService
 {
 /// <summary>
 /// Method for generating cache entry key from ip address and request path  /// </summary>
 /// <param name="requestPath">The request path</param>
 /// <param name="ipAddress">The ip address</param>
 /// <returns></returns>
 public string GenerateAccessHistoryKey(
string requestPath,
string ipAddress
 );
 /// <summary>
 /// Method for retrieving cached access history entry by key
 /// </summary>
 /// <param name="key">The cache key</param>
 /// <returns></returns>
 public AccessHistory? GetAccessHistoryByKey(string key);
 /// <summary>
 /// Method for updating cached access history entry by key
 /// </summary>
 /// <param name="key">The cache key</param>
/// <param name="timeframeSeconds">Entry validity window</param>
 public void UpdateAccessHistoryForKey(
string key,
int timeframeSeconds
);
 }
/// <inheritdoc cref="IIPAccessHistoryService"/>
public class AccessHistoryService : IIPAccessHistoryService
{
 private readonly IMemoryCache _cache;
 public AccessHistoryService(IMemoryCache cache)
 {
 _cache = cache;
 }
 public string GenerateAccessHistoryKey(string requestPath, string ipAddress)  {
 return $"{requestPath}_{ipAddress}";
 }
 public AccessHistory? GetAccessHistoryByKey(string key)
 {
 return _cache.Get<AccessHistory>(key);
 }
 public void UpdateAccessHistoryForKey(
string key,
int timeframeSeconds
 )
 {
 var currentHistory = GetAccessHistoryByKey(key);
 if (currentHistory is null)
 {
 var now = DateTimeOffset.UtcNow;
 _cache.Set(key, new AccessHistory()
 {
 LastAccessTime = now.UtcDateTime,
NumberOfHandledRequests = 1
 }, now + TimeSpan.FromSeconds(timeframeSeconds));
 return;
 }
 _cache.Set(key, new AccessHistory()
 {
 LastAccessTime = DateTime.UtcNow,
 NumberOfHandledRequests = currentHistory.NumberOfHandledRequests + 1  });
 return;
 }
}
Above implementation allows setting an access history object in cache at the key consisting of http request path and ip address concatenation. It will also set the absolute expiration time for cached entry equal to passed method parameter value.
There is also a method dedicated for retrieving cache entries by key
Let’s dive into details and implement a custom rate limiting middleware class which will take care of actual access denial (returning HTTP 429 status code) if specific conditions are met:
public class LimitAccessMiddleware
{
 private readonly RequestDelegate _next;
 public LimitAccessMiddleware(RequestDelegate next)
 {
 _next = next;
 }
 public async Task InvokeAsync(
HttpContext context,
IIPAccessHistoryService ipAccessHistoryService
 )
 {
 var requestEndpoint = context.GetEndpoint();
 var attr = requestEndpoint?.Metadata.GetMetadata<LimitAccess>();
 if (context.Connection.RemoteIpAddress is null
|| requestEndpoint is null
|| attr is null)
 {
 await _next(context);
 return;
 }
 var cacheKey = ipAccessHistoryService
 .GenerateAccessHistoryKey(
context.Request.Path,
context.Connection.RemoteIpAddress.ToString()
);
 var accessHistory = ipAccessHistoryService
 .GetAccessHistoryByKey(cacheKey);
 if (accessHistory is not null
 && DateTime.UtcNow < accessHistory
.LastAccessTime
.AddSeconds(attr.TimeWindowSeconds)
 && accessHistory.NumberOfHandledRequests == attr.MaxRequests)  {
 context.Response.StatusCode = StatusCodes.Status429TooManyRequests;  return;
 }
 ipAccessHistoryService
.UpdateAccessHistoryForKey(
cacheKey,
attr.TimeWindowSeconds);
 await _next(context);
 }
}
Optionally, we can write an extension method for registering our custom middleware directly at the IApplicationBuilder level:
public static class MiddlewaresExtensions
{
 public static IApplicationBuilder UseCustomRateLimiting(
this IApplicationBuilder builder
 )
 {
 return builder.UseMiddleware<LimitAccessMiddleware>();
 }
}
At the end, let’s use our custom middleware by registering it:
public class Program
{
 public static void Main(string[] args)
 {
 var builder = WebApplication.CreateBuilder(args);
 builder.Services.AddControllers();
 builder.Services.AddMemoryCache();
 builder.Services.AddEndpointsApiExplorer();
 builder.Services.AddSwaggerGen();
 builder.Services
.AddScoped<IIPAccessHistoryService, AccessHistoryService>();
 var app = builder.Build();
 if (app.Environment.IsDevelopment())
 {
 app.UseSwagger();
 app.UseSwaggerUI();
 }
 app.UseCustomRateLimiting();
 app.UseHttpsRedirection();
 app.UseAuthorization();
 app.MapControllers();
 app.Run();
 }
}
Highlighted lines are related to components of the rate limiting mechanism that we implemented before.
Sample usage (attribute applied to a default .NET template Weather controller method):
[HttpGet(Name = "GetWeatherForecast")]
[LimitAccess(MaxRequests = 5, TimeWindowSeconds = 30)]
public IEnumerable<WeatherForecast> Get()
{
 return Enumerable.Range(1, 5).Select(index => new WeatherForecast  {
 Date = DateTime.Now.AddDays(index),
 TemperatureC = Random.Shared.Next(-20, 55),
 Summary = Summaries[Random.Shared.Next(Summaries.Length)]  })
 .ToArray();
}
Prepared solution will process every request made to a GetWeatherForecast endpoint and after verification process – handle it normally or return appropriate HTTP response with 429 status code.
The other way – third party library based rate limiting in .NET
A third party library used as a rate limiting functionality provider is another common solution. This approach is slightly easier to implement from the developer perspective as we are only the consumer, the code performing the actions is usually packed in a NuGet package and there is only a set of methods exposed by the author that are available to use.
However, the code embedded in this kind of NuGet package is usually something very similar to our previous custom implementation (use of middleware and attributes is a common practice and the level of configurability of components determines the maturity and usability of the solution).
Pros and cons of third party library
By using a third party library we reduce our control on how the code actually works but we also standardize the way how rate limiting mechanism is implemented in our applications.
However it is still good way for leverage rate limiting, especially if we are sure that the code/package that we want to utilize is widely used by the community, stable and easily configurable.
Rate limiting implementation using AspNetCoreRateLimit
See how to use a popular open-source NuGet package: AspNetCoreRateLimit made by Stefan Prodan and Cristi Pufu.
First of all, we need to add a dependency to AspNetCoreRateLimit NuGet package to our project:

Next, since the NuGet package uses configuration file for defining the rate limiting rules, we need to add a section to it:
"IpRateLimiting": {
"EnableEndpointRateLimiting": true, // this specifies that rate limiting is  applied to specific endpoints, not globally
"StackBlockedRequests": false, // if set to true, all rejected requests are  counted
 "RealIPHeader": "X-Real-IP",
 "ClientIdHeader": "X-ClientId",
 "HttpStatusCode": 429,
 // General rules of rate limiting in the application
 // defined per endpoint, supports regular expressions
 "GeneralRules": [
 {
 "Endpoint": "GET:/WeatherForecast",
 "Period": "10s",
 "Limit": 2
 }
 ]
}
Last configuration step is to register all required components at startup:
public static void Main(string[] args)
{
 var builder = WebApplication.CreateBuilder(args);
builder.Services.AddMemoryCache();
builder.Services.Configure<IpRateLimitOptions>(
builder.Configuration.GetSection("IpRateLimiting")
);
builder.Services
.AddSingleton<IIpPolicyStore, MemoryCacheIpPolicyStore>();
builder.Services
.AddSingleton<IRateLimitCounterStore, MemoryCacheRateLimitCounterStore>(); builder.Services
.AddSingleton<IRateLimitConfiguration, RateLimitConfiguration>(); builder.Services
.AddSingleton<IProcessingStrategy, AsyncKeyLockProcessingStrategy>();  builder.Services.AddInMemoryRateLimiting();
 builder.Services.AddControllers();
 builder.Services.AddEndpointsApiExplorer();
 builder.Services.AddSwaggerGen();
 var app = builder.Build();
 if (app.Environment.IsDevelopment())
 {
 app.UseSwagger();
 app.UseSwaggerUI();
 }
 app.UseIpRateLimiting();
 app.UseHttpsRedirection();
 app.UseAuthorization();
 app.MapControllers();
 app.Run();
}
This configuration sets up rate limiting on /WeatherForecast endpoint allowing 2 requests to be made per each 10[s] time window. After exceeding this limit, the response will look as following:
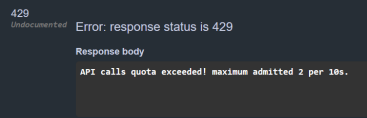
Presented example covers only a simple scenario and the AspNetCoreRateLimit package offers much more interesting options for rate limiting to be configured.
I encourage you to check this library GitHub page: link where you can find more details.
Finally, .NET 7 built-in rate limiting
Built-in rate limiting was a feature which was long awaited by the .NET community. In .NET 7 it was finally shipped as a part of platform code, available in the Microsoft.AspNetCore.RateLimiting namespace.
Thanks to the fact that it is available out of the box, our new projects can use one, standardized solution, which is made by Microsoft team, powerful (in terms of offered range of functionalities), easy configurable and will be supported for a longer period of time.
Let’s go straight to the code and try to implement simple rate limiting while covering 4 types of rate limiting algorithms.
First, we need to make sure our WEB-API project is targeting at least .NET 7. Next, in the configuration section of our application, we should add following lines:
builder.Services.AddRateLimiter(options =>
{
// by default the rejection status code is equal to
// 503 (service unavailable).
 // It is better to change this status to something more suitable  options.RejectionStatusCode = StatusCodes.Status429TooManyRequests;
 // here, a specific rate limiting policy can be defined
 // .
 // .
 // .
});
We should not forget about using the middleware:
app.UseRateLimiter();
That’s pretty much everything we need in terms of registering built-in .NET rate limiting.
After doing all of the above, we can define which type of rate limiting algorithm we want to use and set some extra options for it. We can do it directly using the rateLimiterOptions parameter of the AddRateLimiter method Action.
Implementation examples of available algorithms
1. Fixed window limiter algorithm
Uses AddFixedWindowLimiter method to configure a fixed window limiter. The Window option accepts TimeSpan value and defines the size of the timeframe. When the timeframe expires, a new one begins and the limit is reset.
builder.Services.AddRateLimiter(options =>
{
 options.RejectionStatusCode = StatusCodes.Status429TooManyRequests;
 options.AddFixedWindowLimiter("fixedWindow", options =>
 {
 options.PermitLimit = 5; // the actual limit per timeframe  options.Window = TimeSpan.FromSeconds(10); // the timeframe size  // when the limit is hit within a timeframe,
 // the blocked requests will be queued and processed when possible  // applying from oldest to newest order
 options.QueueProcessingOrder = QueueProcessingOrder.OldestFirst;   options.QueueLimit = 5;
 });
});
2. Sliding window limiter algorithm
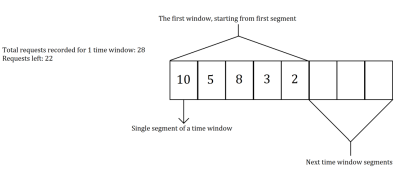
This is a variation of the fixed window limiter algorithm but our timeframe (window) is additionally divided into segments.
As the time passes, our window slides” through the next segments and the count of requests made per segment are tracked.
Let’s visualize this concept on 2 iterations of the algorithm assuming we have a fixed 50 requests limit per 1h timeframe being divided into 5 segments (1 segment = 12 min).
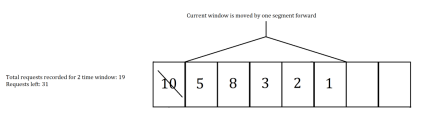
And here is the state after first „slide” in the algorithm (we moved one segment = 12 min forward so another 5 segments are taken into account – 4 previous and 1 new):
Here is the configuration code used for setting up this algorithm:
options.AddSlidingWindowLimiter("slidingWindow", options =>
{
 options.PermitLimit = 50;
 options.Window = TimeSpan.FromMinutes(60);
 options.SegmentsPerWindow = 5;
 options.QueueProcessingOrder = QueueProcessingOrder.OldestFirst;  options.QueueLimit = 5;
});
3. Token bucket limiter algorithm
This algorithm assumes we are starting with a bucket that can hold a fixed amount of tokens.
At the beginning our tokens are all available. Next, one or more requests comes in and takes tokens from the bucket. Token is taken forever but the algorithm has an option to replenish missing tokens in our bucket (maximum number of tokens in bucket cannot be exceeded).
If there are no tokens left in the bucket – requests will be blocked and queued for later processing (when any token will be available again).
We set the replenishment period to a suitable value and optionally we can also set the flag for the auto replenishment (so that the system tracks and updates it for us).
Below you can find a configuration code for this algorithm:
options.AddTokenBucketLimiter("tokenBucket", options =>
{
 options.TokenLimit = 80;
 options.TokensPerPeriod = 20;
 options.AutoReplenishment = true;
 options.ReplenishmentPeriod = TimeSpan.FromSeconds(10);
 options.QueueProcessingOrder = QueueProcessingOrder.OldestFirst;  options.QueueLimit = 5;
});
4. Concurrency limiter algorithm
It’s the last one from available built-in rate limiting algorithms. It is basing on the easiest to understand concept – only the specified number of requests can be processed concurrently.
Code sample:
options.AddConcurrencyLimiter("concurrencyLimiter", options => {
 // we allow only 5 requests to be processed concurrently  options.PermitLimit = 5;
 // queue ones that exceeded limit
 options.QueueProcessingOrder = QueueProcessingOrder.OldestFirst;   options.QueueLimit = 5;
});
In terms of actual usage of limiting – new implementation allows us to use attributes both on controllers and actions level.
Below you can find a well-known WeatherForecastController with rate limiting attributes applied:
[ApiController]
[Route("[controller]")]
[EnableRateLimiting("tokenBucket")] // we are indicating a policy name (algorithm  to be used)
public class WeatherForecastController : ControllerBase
{
 [HttpGet(Name = "GetWeatherForecast")]
 // we can override higher-level algorithm directly on method level  [EnableRateLimiting("slidingWindow")]
 public IEnumerable<WeatherForecast> Get()
 {
 return Enumerable.Range(1, 5).Select(index => new WeatherForecast  {
 Date = DateOnly.FromDateTime(DateTime.Now.AddDays(index)),  TemperatureC = Random.Shared.Next(-20, 55),
 Summary = Summaries[Random.Shared.Next(Summaries.Length)]  })
 .ToArray();
 }
 [HttpGet(Name = "GetCurrentTemperature")]
 // we can also disable rate limiting on particular action
 [DisableRateLimiting]
 public IResult GetCurrentTemperature()
 {
 return Results.Ok(30);
 }
}
Summary
APIs access monitoring is a crucial aspect in terms of ensuring high availability and security of our software. The rate limiting technique is a very useful way of increasing control over network traffic in our application.
However, with great power comes great responsibility and rate limiting is about balancing between acceptable load and load that can be treated as an attack or overuse. Therefore, it is very important to analyze characteristics of network traffic at the level of particular endpoints to make sure that we are able to define correct limit thresholds that will both block any malicious attempts and allow normal software usage.
Looking for more programming tips?
Check out our technology bites