

- Mariusz Kujawski
- Read in 4 min.
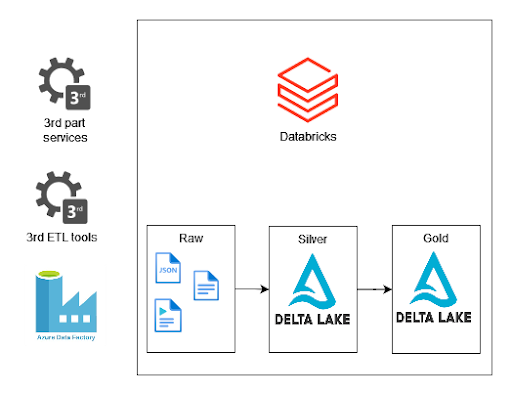
Databricks Auto Loader is a feature that allows us to quickly ingest data from Azure Storage Account, AWS S3, or GCP storage. It uses Structured Streaming and checkpoints to process files when files appear in a defined directory. You can use Auto Loader to process billions of files to populate tables. It also supports near real-time ingestion or can be executed in a batch mode.
Check out this tutorial to find out how to use Auto Loader on Azure Databricks.
Databricks Auto Loader use case
When we ingest data from external sources, we can use cloud native tools like Oracle, SQL Server, Db2, PostgreSQL, SAP, Salesforce, etc. To extract data from sources and store it in the Data Lake, we can use tools like Informatica, SSIS, custom scripts, services or, applications. The problem that we face is detecting new files and process orchestration. Databricks Auto Loader solves this problem because it detects new files and keeps information about processed files in the checkpoint locations in the RockDb database. Moreover, it uses Structured Streaming, so we could build a near real time process to populate our tables.
The Environment
This post will demonstrate how to implement Databricks Auto Loader in Azure. I created an Account Storage, Databricks Workspace, KeyVault, and Service Principal. I’ll demonstrate two files detection modes: directory mode and file notification mode.
Implementation of Databricks Auto Loader in Azure
To make our PySpark script working we need to configure a Service Principal, or we can use the SAS key and the access key from the storage account. One of the good practices is to store information in Azure KeyVault and configure the Secrete Scope in Databricks to use it in a code.
How to read service principal data from the Secrete Scope?
servicePrincipalID = dbutils.secrets.get("<secrete_scoup>", "<secrete_name>")We read the Service Principal data, time to access blob storage. We can mount the blob storage using the command below or configure settings with keys.
dbutils.fs.mount(
  source = "wasbs://test@<account_name>.blob.core.windows.net",
  mount_point = "/mnt/test/",
Alternatively we can use this code to configure access using the Service Principal:
extra_configs = {"fs.azure.account.key.<account_name>.blob.core.windows.net": key})Configuring Service principal access to storage:
spark.conf.set("fs.azure.account.auth.type.<account_name>.dfs.core.windows.net", "OAuth")
spark.conf.set("fs.azure.account.oauth.provider.type.<account_name>.dfs.core.windows.net", "org.apache.hadoop.fs.azurebfs.oauth2.ClientCredsTokenProvider")
spark.conf.set("fs.azure.account.oauth2.client.id.<account_name>.dfs.core.windows.net",servicePrincipalID)
spark.conf.set("fs.azure.account.oauth2.client.secret.<account_name>.dfs.core.windows.net", servicePrincipalKey)
spark.conf.set("fs.azure.account.oauth2.client.endpoint.<account_name>.dfs.core.windows.net", f"https://login.microsoftonline.com/{directoryID}/oauth2/token")
You can test these two ways using dbutils. For instance:
dbutils.fs.ls("/mnt/test/")If it works, we can start our adventure with Databricks Auto Loader. Below, I presented a script that reads CSV files that appear in the storage defined by the path variable. Schema variable indicates the location where the files’ schema will be stored.
path = "/mnt/test/raw/"
schema = "/mnt/test/schema/"
df = (
    spark.readStream.format("cloudFiles")
    .option("cloudFiles.format", "csv")
    .option("cloudFiles.schemaLocation",schema)
    .load(path)
)
To examine how it works we can start with the script that will count the number of rows in files.
from pyspark.sql.functions import input_file_name, count
count_df = (df.withColumn("file", input_file_name())
.groupBy("file")
.agg(count("*")) )
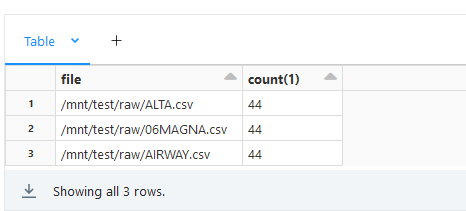
display(count_df)We can upload new files to blob storage and observe how files appear in the result.

After uploading new files you should see.
To save an output of streaming we need to add this line. You can specify a format. I’ll use delta.
df.writeStream.format("delta").option("checkpointLocation","/mnt/test/autoloader/checkpoint").start("/mnt/test/base/")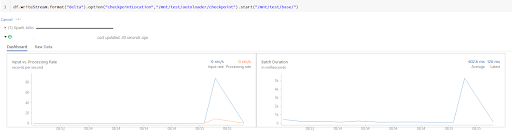
You can observe that the presented example works all the time. In my use case I don’t need to keep my cluster running all the time. To avoid this, I can use trigger property to execute script and finish the script.
df.writeStream.format("delta").trigger(once=True).option("checkpointLocation","/mnt/test/autoloader/checkpoint").start("/mnt/test/base/")Auto Loader file notification mode
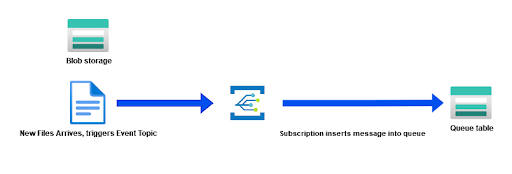
The previous paragraph presented how to use directory mode. According to documentation, for a huge number of files, we should use Auto Loader file notification mode. This mode requires us to configure the right permissions for our service principal to allow Databricks to create Event Subscription and Queue tables. As it’s presented on the screen below, when new files appear Event Grid inserts a message in the Queue table that is read by Databricks Autoloader.
- EventGrid EventSubscription Contributor
- Storage Blob Data Owner
- Storage Queue Data Contributor
Code implementation
When we use cloudFiles.useNotifications property, we need to give all the information that I presented below to allow Databricks to create Event Subscription and Queue tables.
path = "abfss://test@account_name.dfs.core.windows.net/raw/"
schema = "abfss://test@account_name.dfs.core.windows.net/schema/"

df = ( spark.readStream.format("cloudFiles")
  .option("cloudFiles.format", "csv")
  .option("cloudFiles.schemaLocation",schema)
  .option("cloudFiles.useNotifications", "true")
  .option("cloudFiles.subscriptionId", subscriptionId)
  .option("cloudFiles.tenantId", directoryID)
  .option("cloudFiles.clientId", servicePrincipalID)
  .option("cloudFiles.clientSecret", servicePrincipalKey)
  .option("cloudFiles.resourceGroup",  resourceGroup)
  .load(path)
     )
You can see what was created by Auto Loader in the Account Storage section.
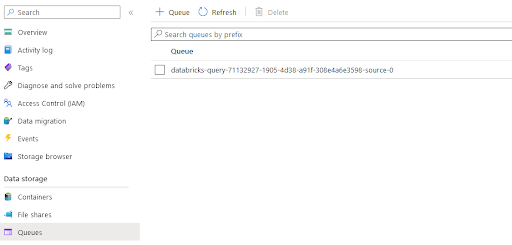
Summary
Incremental loading can be easily implemented with Databricks Auto Loader. It uses cloud native APIs to get a list of files in the storage. We can get new file notifications without additional development. We have it all out of the box. Auto Loader supports schema drift, therefore we can set up many queues to monitor several data sources where we can drop files from our systems.